Tuesday, December 31, 2013

design/spring's 2nd annual gingerbread competition

I missed out on participating again this year, but next year I'm totally entering some type of crazy gingerbread construction into Design/Spring's 3rd Annual Gingerbread Competition. The architecture runs the gamut from traditional to avant garde. Here are a few samples from the early hours of the competition this year, as the entries began to arrive.

Hershey bar solar array! Rice cake water cistern!


A trio from the family competition.


Nice piping on this one, from the dangling icicles to the trees and wreaths.


Fully iced lighthouse, complete with a photo of the inspiration structure.


Another lighthouse with gingerbread tourists and marine life.


There's even a gingerbread boy buried in the sugar sand in the lower right hand corner.


Graham crackers with licorice roof.


Love this gingerbread multi-story building with sugar glass shards on the roof and the dyed coconut/gumdrop flower/cookie stepping stone landscaping.


And to contrast it, a traditional village of tiny houses.


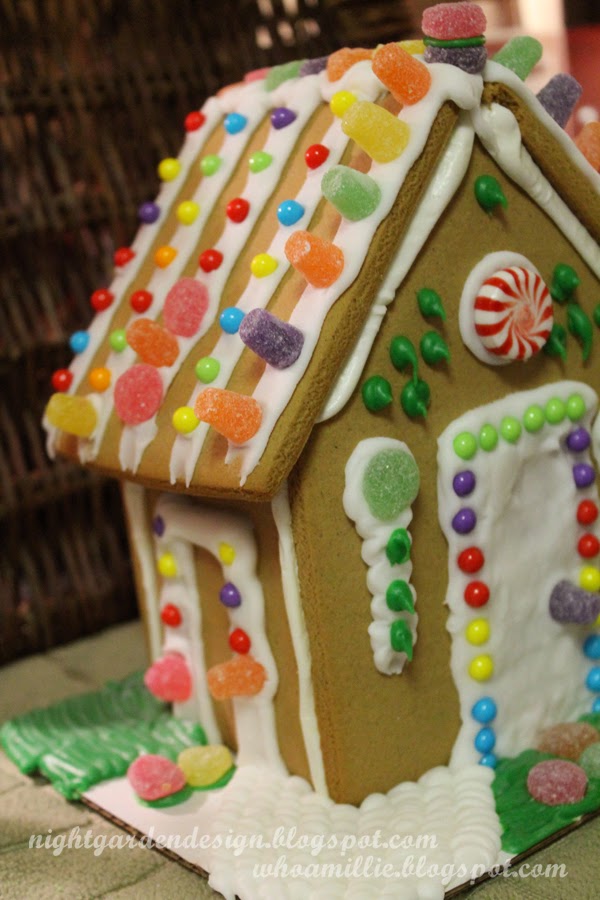
Despite missing the competition, I did sit down with my kiddo to decorate a gingerbread house of our own. We used a kit from Wilton so we could get right to the fun part (bonus: some stores start putting their Christmas items on clearance right before the holiday; we picked up this kit for $5).


If we do one of these next year, I'll try to remember that there are two colors of icing included, but only one decorating bag. We ended up with an interesting combination of "snow" and "grass", kinda like after the snow from that storm started to melt a few weeks back.


So, did your family get in on the gingerbread fun this year? Anyone have a preschooler who actually uses more candy to decorate than to eat? Tell me all about it.

Thanks for reading!

Friday, December 27, 2013

wine labels for home vintners (mean hermit edition)

My "spirited" family is full of home brewers and vintners, a hobby many seem to have inherited from my grandpa. Late in life he developed an interest in making his own alcoholic concoctions; if you knew him, you know this was just one of the quirky and amazing things about him from a field of thousands.

This year my aunt and uncle made both wine and beer, and phoned in to ask me to do a little run of wine labels like I did a while back. I riffed off of the "Mean Old Hermit" sign that has hung on the gate of their rural property since time immemorial. This is what I came up with (the names here have been redacted for privacy):


A Google search turned up an old 1920s (copyright free) image of an old bootlegger simultaneously smoking a pipe, brandishing weapons and holding a liquor bottle. Perfect. I wasn't there to see my aunt and uncle open the package, but they tell me there was much laughter.

To make the two-toned sketched image, I used a very fine-lined drawing tool in Illustrator and, with my pen/stylus and drawing tablet in a separate layer, I drew over the highlights. When I was done, I dropped in the black background and added typography (fonts are 1942 Report, Rustic Regular {from Dover}, and Cavalcade).


Once I'd printed them out on label paper using my ink jet (because the local print shop took five days to return my e-mail), I gilded the 2012 using a gold paint pen and sprayed the labels with Mod Podge acrylic spray. I let them dry and air out for a couple of days before cutting them apart and packaging them up.


A note: I've been told by my aunt that labeling is done according to the year of the grapes, so 2012, not 2013, is the correct vintage in this case. The wine aged for a year before being given out as gifts.

I call the wine "house red" on the labels because the grape vines grow on the front of their house. Not accurate by wine industry standards, but not an issue for their friends and family.

I hope if you're a beginning Adobe Illustrator user, you can make sense of the above description of my process (specifically the part where I sketched over the image highlights). If not, and you're interested in learning more, drop me a note and let me know if I can make things clearer. Please remember to respect my copyrighted work (anything on this blog), but feel free to use any methods as a springboard for your own designs.

And if you want wine or beer labels of your own but don't want to learn a new program to design some, I freelance! Just contact me and I can work you up some wine labels of your very own for a really reasonable rate. Better yet, after an initial design fee, I can even send you digital files for five years worth of dated labels to print from.

Thanks for reading! 

Friday, December 20, 2013

chevron wedding quilt (part one)


I'm a bit in over my depth here, having never completed a queen-sized quilt. But I'm making progress.

Here are the square patches, each stitched from to triangles of grey/yellow/black/white fabric.


Most of the fabric was used on the tables at my sister's wedding reception, with some filler from the fabric store in the same color range.

After I'd used up all of my fabric making blocks, I made a chart in Illustrator to work out the pattern. I counted my patches and made a simple replica of each one, grouping, copying, and pasting the right number of copies before arranging them in a simple chevron pattern.

Much easier than trying to find a wide, clean, preschooler-free space to lay everything out, believe it or not. I'm using shaded overlays to keep track of which areas I've already completed: the white shaded areas on the left are completed; the grey shaded area is stitched into short rows, waiting to be assembled to finish that section.


The blocks are coming together. Instead of long strips, I sewed the first 2/3 of the top in nine- or twelve-block sections and then sewed the sections together. The hope was that I'd keep the corners well-aligned this way, but you can tell from the photos that despite my careful ironing, trimming and sewing, there are still some "off" corners. I'm trying not to obsess over it, with limited success.


The good news is that with the prep work done, the the sewing is going quickly. The bad news is that I have no idea at all how to stitch all the layers together on something so large, and still keep the wrinkles at bay. We'll have to wait and see how that goes.


This careful measuring, ironing, trimming, etc. is very different from the way I usually work with my hands. This is more like graphic design, where I treasure rulers and rules. So it's a switch, but I'm enjoying it, I think.

Wish me luck with the finishing stages!

Thursday, December 5, 2013

7 diy gift tutorials from my blogs


With the holidays coming up, I wanted to put together a quick post for you all featuring links to seven of my most popular DIY gifts! Here they are, in no particular order, so you can spend less time and money at the mall this year, and give gifts that mean a lot to family and friends who mean a lot to you.


Originally made for my nephew, this has been popular on Pinterest this past year. Wanna put one together for someone special? Here's the link.


These were party favors for my kiddo's second birthday party, but if you make a mold using the silicone kit I link to, you could make a set for every kid on your gift list. They look awesome, but are really inexpensive and fun. Find the tutorial here.


If you like upcycling and repurposing (and you have a second-hand building supply store in your area) these make really nice gifts, and they're something you can put together pretty quickly. You can find instructions here.


Made of scraps of faux fur and felt, these monster pillows are one of my favorite projects to make for a quick birthday or Christmas present. With a single yard of faux fur, you can make four to six 12-inch pillows (depending on the width of the bolt of fabric). Make a few this holiday season using my quick tutorial.


There's still time to order some measuring tape growth chart fabric to put together one of these wall-hangings for someone you love! Spoonflower is about ten days out on orders, but that should still give you a bit of time for assembly if you get your order in soon. (I sell the fabric and finished charts through my Etsy store, too, but my supply is low right now due to holiday orders). Click here for the assembly instructions. Oh, and I have a metric version available, too! (One yard will make 2 1/2 charts, or order single panels directly from me.)


Custom screen printing with mesh fabric, embroidery hoops and latex paint? Yup. Make your own t-shirts this Christmas and knock a bunch of names of of your shopping list.


This is a great project for one-off prints. In this post, I present a dinosaur t-shirt, and links to other places in my blog where I feature a pretzel shirtviking t-shirt, and wood-grain flour sack tea towels. Infinitely customizable, without the time investment of making a silkscreen for each design. Find it here.

All right, readers! Go forth and craft like you've never crafted before! Let's do this!

Friday, October 25, 2013

found: good news / bad news

Found at the school playground last weekend, in separate locations. (Click to enlarge.)


Tuesday, October 22, 2013

rubber eraser wrapping paper printing


For the dinosaur-themed birthday presents I mentioned back in the chasmosaurus t-shirt post, we wanted a little dino-themed paper for wrapping.


Among the many craft supplies I had laying about were some Pink Pearl erasers and some accounting-style graph paper from the Goodwill. Combined, they made some Jurass-tastic gift wrap!

I used an X-acto knife to cut one side of the eraser to look like a brachiosaurus . . .


. . . and cut a prehistoric palm tree onto the other.


Then the kiddo and I got out the washable stamp pads and stamped blue dinosaurs and green trees all over the graph paper. I guided his hand a bit to keep a pattern going, but a couple of randomly printed sheets turned out pretty nice too.


I accented with some pens and wrapped up the gifts (a t-shirt, as previously mentioned, and a hat I'll be blogging about soon). I also drew some little tags to go with each gift. One of these days I'll remember to photograph every part of a process; that day is not today.


And there you have it! Some fancy wrapping paper you can whip up for any occasion with stuff you probably already have. 

Thanks for reading!

Saturday, October 19, 2013

finishing up our fix-it felix costume

If you're following along with the Fix-It Felix costume tutorials, you can find the golden hammer tutorial here, the cap here, the shirt/name patch tutorials here, and the glove tutorial here. Here on in, I'm going to cover the boots, pants, and the tool belt.


We lucked out and found a pair of pre-schooler-sized work boots in my kiddo's size at a thrift store for a couple of bucks. Maybe it's because we live in the Northwest; there were three similar pairs in different sizes on the shelf the day we found these. I highly recommend checking thrift stores for these before you buy something new, especially if the work boots are going to be semi-retired after Halloween.


The laces were shredded, so I replaced them. A new pair cost around $2 from Target. I know tons of other stores carry them for a similar price. Also, to help you pick the right shoelace length, count how many pair of holes your boot have. There'll be a guide on the rack or the back of the package to tell you the correct length. Handy, right?

The jeans are just as easy. If you don't already own a pair, these are super-easy to thrift. Go for straight legs in a dark finish to most closely resemble the movie. Then, just roll the cuffs for a perfect match.

The Tool belt

On to the tool belt!


I'll save you the trouble of my silly repetition and link you here to the Two Little Hooligans toddler tool belt tutorial. I used her measurements but made some changes to build my kiddo's tool belt. To start, I used a piece of painter's tarp to make mine.


I made my hammer first, then I measured around it and added four inches to determine the size of the hammer loop. This seemed to me to be the very best way to make sure the hammer would later fit inside the hammer loop.


I simplified the pockets by leaving off the second tool loop and attaching the pockets directly to the belt instead of using the sliders Christina recommends on her blog.


I decided it would be a good idea to dye the tool belt before attaching a buckle so that the dryer wouldn't do what the dryer does when heavy metal buckles go in. 

I used the same combo of Dylon's Sunflower and Terra Cotta dyes that I used on the first pair of cotton gloves in yesterday's glove tutorial. If I had this to do over:I'd have dyed the fabric first, and sewn the tool belt second. I really liked the structure of the belt better before it went through the wash.


The Hooligans tutorial uses a plastic buckle, I wanted to use a metal buckle. I saved some money and got a sweet looking buckle by buying an old leather belt at St. Vinnie's.


If you decide to use a recycled belt buckle, check the back of the belt; some use snaps so you won't even have to cut into the leather.


After checking my kiddo's waist measurement, I stitched the buckle onto the belt, punched a hole, and done!


And that's it, all done! Thanks for hanging in there for all of the many posts. Good luck and happy Halloween!

Friday, October 18, 2013

re-working adult gloves for kids' halloween costumes

For the gloves for my kiddo's Fix-It Felix costume, I came up with several options.

Felix's gloves are solid tan in color, probably meant to mimic this pair, made of pig skin. I didn't order them because (a) they're too big; (b) locally, I found a pair but they cost $21; and (c) my aunt used to have a pet pig. He was really smart.

I searched for alternatives, and eventually found a pair of plain-colored cotton canvas work gloves at the thrift store for 99 cents. Dyed (with a combo of Dylon's Sunflower and Terra Cotta colors), they came out pretty close to the color I wanted. Still too large, but at least close to the right color.


But then I happened upon a pair of flannel work gloves that were even closer in color, except for the cuff.  They were also softer and more pliable, so I went for it. Note: this photo was taken after the fingers had already been shortened, as explained in the next step.


To shorten the fingers of adult-sized gloves: first turn them inside-out, then try them on the person meant to wear them. Mark where the fingers will end on the new-and-improved version (leaving a little room for the seam allowance) then stitch, cut off the excess fabric, and turn right-side out.

Next, remove the non-matching cuff by pulling out the stitches with a seam ripper.


Zig-zag the raw edge, then give it a very narrow hem.


Finish the glove with a band of 1/4-inch elastic stitched in place about an inch from the new hem.


And you're finished! Below is a photo of the finished gloves on my fully-costumed kiddo, holding Felix's gold hammer. (You can also see a bit of the tool belt, which I'll be talking about in the final Fix-It Felix blog post tomorrow.)


This will work on any gloves made of woven cloth. You may even have good success on gloves made of knit fabric, if you zig-zag the ends of the fingers to prevent them from unraveling. Leather, though, might be trickier, depending on the thickness and stiffness of the leather.

Tomorrow will be the last in this series, featuring the tool belt, pants, and boots, so come on back if you're trying to finish up a Fix-It Felix costume of your own by the time the weekend is over!

Need to find the other costume tutorials fast? Click here for the shirt and name patch, here for the magical golden hammer, and here for the cap and double-f patch.

Thanks for reading!