Wednesday, February 27, 2013

pinterest challenge: vertical hanging planter

Pinterest, I've said it before and I'll say it again: you'll be the death of me.

On the other hand, I'm lucky enough to get to participate in the Young House Love/Bower Power Blog completely unauthorized Pinterest Challenge because of you, so maybe it's a draw?


Okay, fine. I love Pinterest. I've found it an endless source of inspiration and ideas. The only trouble I have is in distilling the content; I want to do everything. Like vertical gardening, for example. Wall pockets, hanging planters, cinder blocks, you name it, I want to make it.


original pin here
inspiration board dedicated to vertical and hanging planters and gardens here


Distill! Distill!

I took all those inspirational images and tutorials and made this: an upcycled wall planter homage to wall gardens. It wasn't exactly free, but it was pretty inexpensive, and mostly used materials (and plants) I already had on hand.


Materials:

Old iron planter basket (sans chains)
soil
pine shavings
hardware cloth or chicken wire remnant
awning remnant
hens & chicks
wire
thyme
heavy coat hook 

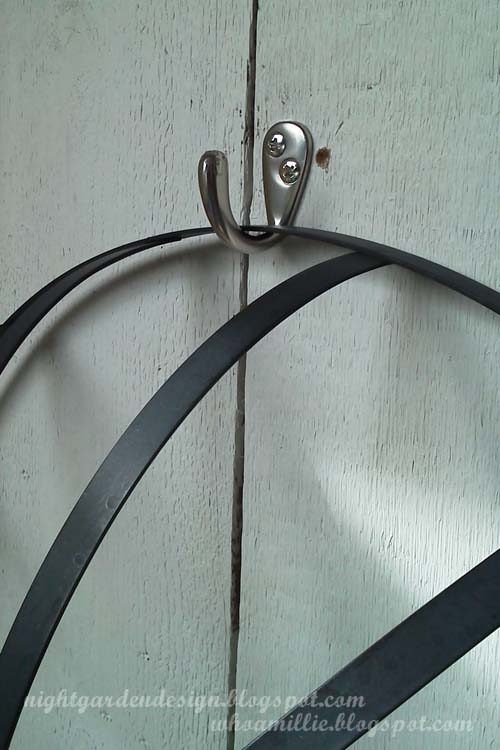
Get an old iron planter basket (mine cost $2 at Bring). You'll need to acquire this first, as you'll use it to determine how large to cut your burlap and hardware cloth. You could also use an old bicycle wheel; one of the pins above makes a spinning planter with one. (Note: Bring marks prices with a paint pen; I've had good luck removing their prices with a Magic Eraser.)


After testing placement, replace your chintzy picture hanging hook with a nice, sturdy coat hook.


Sew a "pillow" from old coffee sack burlap, using twine pulled from the sack to sew it up. Turn it inside out and fill with a mixture of potting mix and pine shavings (to make it more lightweight).


Stitch the pillow closed and stuff it into your planter basket.


Cut some hardware cloth to the approximate size and shape of your container's back using tin snips. I had a large piece leftover from an old playhouse we tore down awhile back; chicken wire would work well, too. Cutting it down to an approximate size first makes it easier to work with when you're ready to do more exact cuts later.


Set aside your hardware cloth for the next step.

If you'll be hanging your vertical wall planter on a surface you want to protect marginally, you should add a waterproof layer so that the dirt and water don't soak through the burlap, causing stains and rot. You can use an old piece of tarp, or one of those poly pet food bags, or (like me) a piece of an awning destroyed in a windstorm. Cut it out and place it on top of your dirt pillow.


Trim down the hardware cloth to fit, then tuck it in place over the waterproof layer and use wire and some needle nose pliers to attach it to the basket.


Turn the pod over and lay it flat to begin filling in your plants. 


I trimmed some of my hens & chicks plants down, and also added a divided thyme seedling and a whole lotta moss. (We'll see what survives!)


Poke or cut holes in the burlap and thread roots or runners into the holes.


 Fill in around plants with moss.


I hung mine up right away for photos, but pretty much universally, it's agreed you should water it and leave it flat for a couple of weeks to allow the plants to take root. So after taking some pictures, I took the planter down again and laid it flat to do exactly that.


Patience is a virtue.

Thanks for reading, and thanks to Sherry and Katie for issuing the Pinterest Challenge! It's always good to have the chance to mark a project off my list . . . especially one that first caught my attention over a year ago. 

Linking up to:


Friday, February 22, 2013

delusions of grandeur part 5: robot cake


We must have watched that Betty Crocker/Howdini robot cake tutorial a hundred times. You know the one; the tutorial that comes up as the top eight hits when you search for robot cake tutorial videos? This one right here. Someone's marketing intern spends a lot of time getting that thing posted EVERYWHERE.

And I was going to make it. I had decided not to go overboard on the cake this year, as last year's Zelda cake had me up till three in the morning. I'm too tired for that. So I was going to make the quick robot cake. The easy robot cake. The fast robot cake.

And then, my almost-three-year-old uttered the words that spelled my certain doom: "I want the robot cake to stand up."


It was innocent, really. But birthday wishes are nearly impossible to deny. I mean, he only has so many years he'll be willing to let me make silly things for him. I'll blink my eyes one day and he'll have sprouted chin whiskers and sarcasm, and my days of making robot cakes are over.


Or at least that's how I justify this year's delusion of grandeur. Cake Boss makes it all look so do-able. I blame Cake Boss.


I hemmed and hawed on whether or not to build this, and in the end, to draw the Mister into the fray with me, I asked him to be the Wielder of the Drill. I found this tutorial on making a cake stand, then simplified it by using pre-cut wooden plaques and dowels from the craft store, plus some super-strength hot glue.


To make it, pick up an 8-inch round plaque  and two 5x7-inch rectangular plaques. Drill holes to fit the 3/4-inch dowel, then glue in place with hot glue. Use a level while the glue sets, and offset the feet to offer a wider base in more directions for stability. Voila!

The video there calls for using donuts to cover the leg dowels. I tried using donuts. Here's some proof, along with the five-layer vanilla buttermilk M&M cake (we call it Pancake Cake) getting a crumb coat of maple sugar frosting.


But I didn't like the way it looked. Especially after a day in the fridge where, even wrapped, the leg donuts started to dry up and show off their seams. Yuck. I needed a plan B, and luckily, I had one in the form of a half a tray of leftover Rice Krispies treats I'd made for the head. In future photos, that's what you'll see (covered entirely in marshmallow fondant) in place of the donut legs.


It went back in the fridge after the crumb coat. Then I started rolling out the fondant . . . and then rolling it out again . . . and then rolling it out again. Four times in all, by the time I'd smoothed the fondant onto the cake without it ripping outright.

And I don't have a lot of photos of the cake in process from this point forward because of the sugar and the sticky all over my hands . . . so let's look at at some more photos of half-eaten cake while I tell you a little bit about it.

First off, the recipes. 

I was looking for something nice and sturdy for the robot cake, since it was going to be several layers high. Regular box mix isn't dense enough (and doesn't taste as good as the recipe I eventually chose . . . trust me. And the family. And the guests at the party. And the Mister's co-workers.) so I went to my stand-by cookbook for tall cakes: Sky High by Alisa Huntsman, Peter Wynne, and Tina Rupp. 


I chose the Vanilla Buttermilk Cake recipe. I wanted something kinda plain because I planned to add M&Ms to the batter. It tastes like the very best pancakes you've ever eaten, but more cake-y. I'm going to link you here to a VERY similar recipe at Sweetapolita, but I still recommend picking up a copy of this book. I've used at least five recipes from it, and they've all been really, really satisfying. You know what I mean. Sometimes desserts look or sound better than they taste. The recipes I've used from this book live up to your expectations.


I made two full recipes for a total of six layers (but only used five for the final cake). Instead of using the chocolate icing recipe included with this cake recipe in the book, I made maple cream cheese icing. Well, semi-made. 

I mixed four tubs of store-bought cream cheese icing with food coloring and maple flavoring (to taste; I think it was two teaspoons) in my Kitchen-Aid. I recommend it. The combination was pretty darn good.

The cake doesn't develop much of a dome as it bakes, so I didn't have to do any trimming, and the amount of frosting I mixed up was just about the right amount for sticking the cake securely to the robot-legs cake stand, frosting between each layer, and crumb coating the entire stack.  

The cupcakes were simpler.  Chocolate Peanut Butter Cup Cakes, made with a double-chocolate cake mix doctored with extra eggs and buttermilk as recommended in Hello, Cupcake. I added peanut butter chips in, too. A lot of them. Bwa-ha-ha! Birthdays rule! (Until the diabetes sets in.)


Peanut butter cream cheese icing, of course, like last year, because it's so darn good. Half a cup of peanut butter to one tub of cream cheese icing. 


Because I was busting these out while my kiddo and the Mister were out on the town, I didn't have anyone around to snap photos while my hands were covered in stuff you shouldn't get on a camera. And at the party I was flying around and didn't get a chance to snap as many photos as I would have liked, so the only images I have of the finished cupcakes are in shots like these, where you can almost make them out in the crepe streamers.


Rar. The green peanut butter icing had blue and green sugar crystals dusted on the rims. Some of the cupcakes spelled out my kiddo's name in silver fondant letters; others had individual fondant robot parts painted with food coloring and dusted with pearl dust, and were arranged to form whole robots. (Surely someone has a photo. I'll update this if one pops up.)

Speaking of fondant, I've worked with marshmallow fondant before, and I still can't get it right. There's some technique I'm missing, wherein the stuff doesn't rip and tear and pull apart when you're trying to drape it over a simple round cake. 

So I did it four times. The second time, I was this close, and then the weight of the fondant itself pulled a tear right along the top edge. The third time, it stuck to the table. Arrgh.


I finally got it on there, but as I'd worked it unto death, there are the tiniest micro-fractures in it. Of course, because I'd spent so much time rolling everything out, by the time I finally had it good to go, the crumb coat wasn't sticky any more. I brushed a little corn syrup on the sides of the cake to help the fondant stick. It worked like a charm.

In the comments section of the marshmallow fondant recipe I used, a few people imply that this recipe isn't awesome for making decorations, but that wasn't my experience. It set up fine, just like other recipes I've used. The flat decorations stuck easily using a paintbrush + lemon juice/water to glue them in place, and the round balls on top of his antennae firmed up very well. I had just as easy a time cutting the rolled fondant with a knife as I did with cookie cutters or the pizza cutter. Other than the draping, it was very easy to work with.


In some places, like the eyes, I had several layers of fondant decorations stuck on top of one another. They stayed in place perfectly. 

The head is made of the standard Treats recipe on the back of the Rice Krispies box, molded in a small, buttered Pyrex bowl. When it had set up in the refrigerator, I slipped it out, iced it (with the leftover peanut butter icing, as I'd used up all of the maple) and covered it in leftover fondant . . . which this time did NOT rip apart. 

The rivets are made using the same drinking straw punch-out method I used on last year's Zelda cake, pressed on using lemon juice/water glue. There are just fewer of them, thank heavens.

I'd pressed the leftover Rice Krispies treats into a cake pan and didn't really have a plan in mind for them until the donut plan went to pieces (literally). I've never used them in an application like this before, and so it was a really happy discovery how well they worked to cover the legs.


I just cut rectangles to fit, and the treats molded easily in my hands to fit around the dowels. My only caveat is that the marshmallow fondant can look a little lumpy over the treats. I think this can be alleviated by adding an extra layer of icing before applying the fondant; lesson learned for next time.

Okay, this is getting legendarily wordy, so let me sum it up with a couple detail photos from the postmortem.


Oh man! I can't believe I finished that whole post! A doozy for sure. Thanks for sticking with it. I learn so much every time I make one of these cakes, and I hope I've anticipated some of the questions other novices might have.

If you have any other questions, ask 'em in the comments and I'll do my best to answer. Otherwise, you can make these photos a bit larger by clicking on them, and get a bit more detail that way! And a big thank you to my sister-in-law M and the Mister for thinking to capture a few photos to add to my few. You guys rock!

Wednesday, February 20, 2013

mercury glass lamp + coffee sack shade


I've been promising to get this tutorial up sooner rather than later because someone specially requested it. This is a fun project, plus a good way to upcycle some thrift store stuff or things you might already have.


Materials:

1) Tall Glass Vase (wide and a little curvy is good). Mine cost $4 with a 20% off coupon at the Village and is 15 inches tall. These can be really expensive new, so it pays to do some thrift store hunting and some garage sale-ing if you have the time.


2) Stainless steel pan lid (one with a screw-on handle and a steam vent) that kinda fits the vase top. Mine was $1 at Goodwill.


3) Lamp kit. I pulled mine out of a thrift store lamp. The lamp cost $3. A new lamp kit from the hardware store cost $12. Plus mine wasn't brass. Just make sure the thrifted lamp is modern and UL listed so you won't have to worry about fire risk.

4) Lamp harp. If your thrifted lamp didn't come with one, you'll need it to hold the lampshade on your new lamp. I found a bin full of these for $1 apiece at Bring. They're way more expensive new.

5) Drum shade. I bought this one for $2.99 at Goodwill. The shape was right, the fabric was horrible. I wasn't sure I'd make it work, but you'll see how I turned it all around. (This will work best if your shade has sides that are straight, and the diameter is the same at the top as at the bottom.)


6) Looking Glass paint (there's no substitute. Le sigh.)

7) Black acrylic paint.

8) Light bulb. I found a large supply of Edison-style incandescents over at the Habitat ReStore for a quarter apiece.

9) Hot glue gun and glue sticks.


11) Dremel tool or drill (to widen the hole in your metal pan lid)

How to Make it:
Shade


Let's do the shade first, because it's the hardest. If your shade is white or neutral colored, you can skip the tedious step of removing the fabric from the shade. If not, use an X-acto blade to carefully slit the fabric (but not the plastic shade).

Carefully puuuuuuuuullllll the fabric off the shade. It will probably be glued down well. It will probably come off in strips. It will probably take really strong fingers and a couple of hours to get it all off. Unfortunately, with colors this bright, covering over the top was not an option. Fortunately, most lampshades don't look like this one did.


Once your shade is blank, set it aside while you cut open and iron your coffee sack on a high steam setting. Get it as flat and smooth as possible. Line up your shade on one end and cut while rolling. Leave a seam allowance of an inch, top, bottom, and end. Once you have your piece cut to the right length, press flat a hem at each short end.


Hot glue one end to the shade, leaving the hem loose for now. Use as much glue as necessary to get the burlap to stick, without seeping through.


Once the glue has cooled, pull and smooth the burlap to test for fit. Attach the burlap to the shade as you roll it, adding glue as needed (especially at the top and bottom edge). When you get all the way around, glue down the starting hem, and glue the finishing hem over the top of it.

Wrap the top and bottom edge of the burlap over the top and bottom edge of the shade and glue to the inside. Where the support brace meets the shade, cut slits on the edge of the burlap for a proper fit.


Done! Yes, this is the hard part. If you've covered shades before or if you'll be using a readymade shade, it won't be that difficult at all.


Lamp


Don't settle for a nine-inch tall vase. Hold out for something the size of a nice, large lamp. Hit a few thrift stores, and you'll find one eventually; they get donated all the time. Once you have one, wash it inside and out. When clean, spray the inside with warm water, then a light layer of the mirror paint. Very light. This paint doesn't have much opacity to it, so you'll still be able to see through it to a degree even after several light layers.

Between layers, you can spray more water if you want a more aged finish. I wanted an extremely imperfect finish, so I was careless with the amount of water and how it pooled when I lay the vase horizontally. I wanted lots of age to it, and things don't age evenly.


Check from the outside to make sure your vase has a mirrored finish. There should be an unevenness to it where the water gathered and ran under the paint.

When everything is dried and cured, take a damp, folded paper towel and add some black acrylic to it. Lightly wipe and dab the inside of the vase with the paint. Some of the mirror paint will come off as you do this; you can control how much. More will be removed when wiping, less when dabbing. The black paint will help the imperfections in the mirror paint to be more visible from the outside.


I used some source images from Pottery Barn and Restoration Hardware to inform my process; how much black did I want to show through? How much silver?


If you make mistakes and remove too much mirror paint, let the acrylic dry and then spray another layer of the mirror.

When you get it just right, set aside the vase and let it dry and cure.

In the meantime, take your pan lid and use a screwdriver to remove the handle. Use a drill with the appropriate size of drill bit for your lamp kit to enlarge the screw hole.


Wash the lid well, then assemble your lamp kit through it. You can use THIS tutorial from Aparment Therapy. Just make sure that the cord + plug runs from the top of the pan lid, down through the steam vent, then up through the screw hole as photographed. This way, drilling through the glass isn't necessary; the cord runs out the steam vent and down the back of the lamp.


You can use small adhesive clips to adhere it to the outside of the glass, but it's not necessary. As you can see in this next photo, the cord is pretty unnoticeable.


Once everything is wired safely and tightly and you've tested with a bulb to make sure it works, use a thin line of hot glue or putty to attach the wired lid to the vase. Use a lamp harp to attach the shade to your lamp. Then plug it in!


If you get stumped, leave me a comment below and I'll help you along!

Thanks for reading!


p.s. you can make these photos larger by clicking on them, but you probably already knew that, clever you!

Linking up to