Bring isn't exactly a
thrift store, but a reuse store that features mainly building materials.
But they do have a large furniture warehouse at the back and a gallery
space at the front that sometimes hosts a collection of harder-to-find
items or art shows of stuff made with recycled materials. Today's post
features things we spied at the store earlier this month while hardware
shopping for a project.
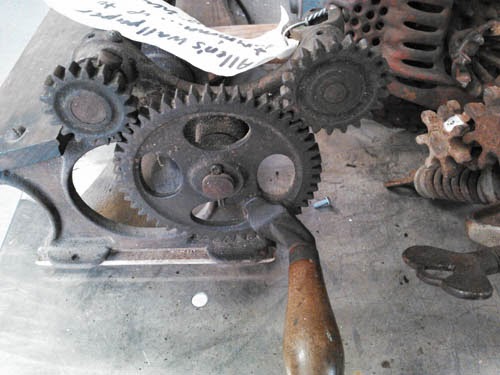
Here's a wallpaper cutter from the late 19th century.
A gigantic Low-Voltage Circuit Tester.
An
antique trunk and an accordion my kiddo was pretty set on. (I think
he's convinced he could school his music teacher if only he was allowed
to touch the accordion.)
Another
antique trunk. This one was priced rather high, even during the 50% off
furniture sale. I went back on another day and someone had tried to
force the lid shut and broke the back off.
An army trunk.
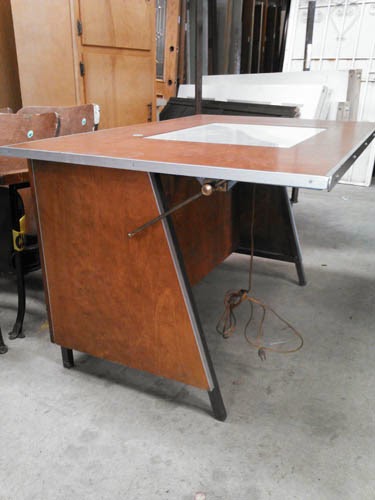
A mid-century drafting table/light table/desk with brass fixtures.
And
those are just a few of the cool things we spied. They also had three
rows of antique theater seats and a couple of sets of lockers that
somehow escaped my camera. I'll stop back in this week and snap some
pictures for a future post . . . unless you get there to buy them first!
Thanks for reading.
Linking up to:
The Cottage Market
Tuesday, May 27, 2014
Thursday, May 8, 2014
coffee sack burlap chair upholsterly
You last saw these chairs at Thanksgiving, 2011, when I repainted and upholstered them with some whimsical sheep fabric . . . it lasted a while, but it was pretty dirty and hard to scrub clean.
I recently reupholstered them again with the front and back of a coffee sack for a little change of pace.
Easy
as pie, just like last time. You'll want to fold over the edge of your
burlap, though, and staple through a couple of layers to keep the burlap
from warping or unraveling.
Here are a few more coffee sack projects I've tackled:
Coffee Sack Tree Skirt
Cushion
Lamp Shade
Wall Art
And here's where you can find a coffee sack or two if you're interested in trying this at home!
Thanks for reading!
Sunday, May 4, 2014
pendleton wool blanket bunny
I worked up a prototype bunny for a little friend's birthday, and I was pretty happy that my tinkering had such sweet results.
This is made with mill scraps from the Pendleton woolen mill here in Oregon.
After a couple of small changes, I hope to have a few of these cuties ready for my Etsy shop; I'll update here when that happens, so stay tuned or send me a little message if you'd like to be notified.
Have you been putting bits and pieces together to make anything cool lately? Leave me a link. I'd love to see it!
Thanks for reading.
Linking up to:
The Cottage Market
My Repurposed Life
Wednesday, April 30, 2014
arrows on the wall
Dropping in with a quick little tip you might find useful: hanging arrows on the wall with simple hardware!
These clips are usually used for fastening cables to interior and exterior walls; I've shown them to you before when I hung my lights in the living room, I think.
They also work wonderfully well for hanging arrows directly on the wall.
I measured down from the ceiling to make sure to keep these level with each other, then just used the clips to nail them directly in place.
That's all there is to it. Maybe this will come in useful at your place? Thanks for reading!
p.s. wall art is by Nikki McClure
Linking up to:
The Cottage Market
These clips are usually used for fastening cables to interior and exterior walls; I've shown them to you before when I hung my lights in the living room, I think.
They also work wonderfully well for hanging arrows directly on the wall.
I measured down from the ceiling to make sure to keep these level with each other, then just used the clips to nail them directly in place.
That's all there is to it. Maybe this will come in useful at your place? Thanks for reading!
p.s. wall art is by Nikki McClure
Linking up to:
The Cottage Market
Saturday, April 26, 2014
a simple baby shower favor for nesting mamas
I'm going to keep this one short and sweet: bird's nest baby shower
favors! Stock up on a couple of things after Easter, and you'll be able
to make a whole grouping of nests for guests.
You'll need:
• edible Easter grass (made from potato starch; it doesn't taste very good. I found mine at Target.)
• speckled candy eggs
• parchment paper
• cellophane bags
• cardstock
• vintage-style labels (I like these)
• stapler + staples
• scissors
• pen
How to:
Take each bag of edible Easter grass and separate it carefully into five sections, one for each nest. Shape a round nest on a square of parchment that will fit inside a cellophane bag. After slipping your nest + parchment into the bag, pile six or seven candy eggs into the nest. Cut and staple cardstock tags over the folded bag tops, then cover front staples with a vintage label. I put the word "nesting" on the front, and on the back, "candy eggs * edible nest" as a little fyi.
These turned out so cute, I know I'll be using them for future showers as well! Thanks for stopping by to check out this sweet little project.
You'll need:
• edible Easter grass (made from potato starch; it doesn't taste very good. I found mine at Target.)
• speckled candy eggs
• parchment paper
• cellophane bags
• cardstock
• vintage-style labels (I like these)
• stapler + staples
• scissors
• pen
How to:
Take each bag of edible Easter grass and separate it carefully into five sections, one for each nest. Shape a round nest on a square of parchment that will fit inside a cellophane bag. After slipping your nest + parchment into the bag, pile six or seven candy eggs into the nest. Cut and staple cardstock tags over the folded bag tops, then cover front staples with a vintage label. I put the word "nesting" on the front, and on the back, "candy eggs * edible nest" as a little fyi.
These turned out so cute, I know I'll be using them for future showers as well! Thanks for stopping by to check out this sweet little project.
Subscribe to:
Posts (Atom)