Bring isn't exactly a
thrift store, but a reuse store that features mainly building materials.
But they do have a large furniture warehouse at the back and a gallery
space at the front that sometimes hosts a collection of harder-to-find
items or art shows of stuff made with recycled materials. Today's post
features things we spied at the store earlier this month while hardware
shopping for a project.
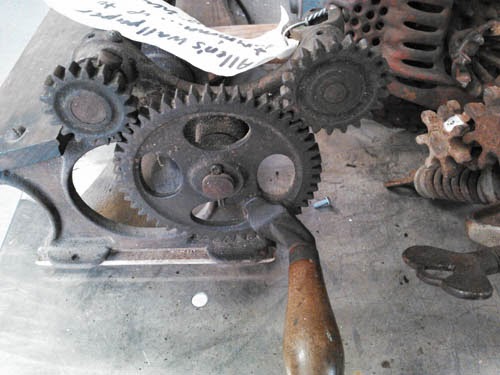
Here's a wallpaper cutter from the late 19th century.
A gigantic Low-Voltage Circuit Tester.
An
antique trunk and an accordion my kiddo was pretty set on. (I think
he's convinced he could school his music teacher if only he was allowed
to touch the accordion.)
Another
antique trunk. This one was priced rather high, even during the 50% off
furniture sale. I went back on another day and someone had tried to
force the lid shut and broke the back off.
An army trunk.
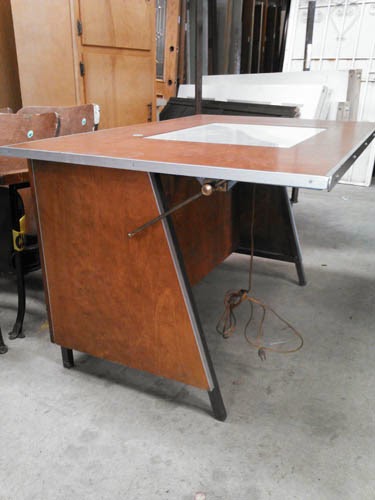
A mid-century drafting table/light table/desk with brass fixtures.
And
those are just a few of the cool things we spied. They also had three
rows of antique theater seats and a couple of sets of lockers that
somehow escaped my camera. I'll stop back in this week and snap some
pictures for a future post . . . unless you get there to buy them first!
Thanks for reading.
Linking up to:
The Cottage Market
Showing posts with label furniture. Show all posts
Tuesday, May 27, 2014
Thursday, May 8, 2014
coffee sack burlap chair upholsterly
You last saw these chairs at Thanksgiving, 2011, when I repainted and upholstered them with some whimsical sheep fabric . . . it lasted a while, but it was pretty dirty and hard to scrub clean.
I recently reupholstered them again with the front and back of a coffee sack for a little change of pace.
Easy
as pie, just like last time. You'll want to fold over the edge of your
burlap, though, and staple through a couple of layers to keep the burlap
from warping or unraveling.
Here are a few more coffee sack projects I've tackled:
Coffee Sack Tree Skirt
Cushion
Lamp Shade
Wall Art
And here's where you can find a coffee sack or two if you're interested in trying this at home!
Thanks for reading!
Wednesday, April 16, 2014
modern industrial file cabinet makeover, part two
Whee! I'm back with the follow up to my recent entry about the modern industrial makeover I gave this 1980s black + fake wood steel filing cabinet.
As you might recall, a few weeks ago I started cleaning my room, realized we needed a full-sized file cabinet instead of a bunch of file boxes, and got sidetracked from the room cleaning project while I finished making it over . . .
. . . into this bare steel industrial-style cabinet. I don't mind having it in my house, even though it's full of boring papers and responsibility.
It's not just me, right? This is a little like when Eliza Dolittle turns out to be a stunner. (The rain in Spain is falling mainly on the plain, am I right?) Or like when Rachael Leigh Cook takes off the glasses and Freddie Prinze Jr. realizes she's Superman?
I really like the way this turned out.
When I last wrote about this cabinet, I'd stripped and sanded the main body and managed to get most of the paint off. I decided to keep the paint that remained after hours of palm sanding (aka: clanging and waking the neighbors) and I'm pretty happy about it. The black paint in the rivets, dents, and folds makes me happy.
Then I attached the casters, bought new from Harbor Freight on super sale. I had first searched the big bin o' casters at Bring and came up a couple short of a matching set, sadly. I like to check there first then follow up elsewhere. I don't always find what I need on the first try, but when I do, it's always worth the search.
I flipped the cabinet, exposing its rusty underside . . .
. . . and used the casters to mark where to drill the holes.
Once the holes were drilled and the filings swept away, I used three little bolts and three little nuts to attach each caster to the cabinet (the fourth hole won't fit on the frame).
And then, with all of the wheels attached, I flipped it upright and the easy part was done.
I say that because this next bit was kind of a trial.
I really wanted bare steel fronts until I started sanding the first drawer with the palm sander. It was slow, noisy work that reminded me (negatively) of sanding the cabinet (clangity clang clang!). I thought I might prime + chalkboard the drawer faces instead. And it was a bad idea.
I'd just finished removing all of that black paint from the rest of the cabinet and I didn't at all like it on the drawer fronts. The paintbrush marks didn't appeal to me, either, so I switched courses (after everything was painted, unfortunately) and decided to try sandblasting.
After a few days of waiting and gathering supplies, here's one attempt with the sandblaster + walnut shell media + 30 minutes. Look at how it's not even breaking through the original wood patterned paint. Awesome.
I switched to using sand as media and had an easier time of it, but really, our air compressor is just too wimpy for sandblasting.
I decided to try the orange paint stripper again and actually had pretty awesome luck with it. You can see here the less reflective (darker) areas where, after an hour or so of sandblasting, some of the paint came off. The lighter areas are where the paint stripper did it's thing, and then I did mine with a Scotch Brite pad, a sanding block, and some steel wool.
It took a bit of work to get the finish even, but only on this one drawer. The others hadn't been sandblasted yet when I moved on to paint stripper.
Handles were next! I shared a photo of seemingly random bits of metal hardware in the previous post; they weren't random after all, at it turns out. I used some of those pieces to make four new handles with the character I wanted.
I made the handles from some blank metal outlet plates and what I think were probably sliding screen door handles in a former life. This was my favorite part of this makeover, and the thing I think added the most to the piece. (I bought the light switch plates, too, unsure of which combination would work out. These cost between twenty-five and fifty cents at Bring, and I'll be able to find another use for them so I wasn't concerned about over-purchasing.)
I drilled holes through the old handles, using the blank outlet plates as templates. Little bolts and nuts joined them together to make a nice flat surface for the final piece.
After drilling one more hole and applying one more bolt per drawer, the handles are complete. When well-tightened, these don't shift or wiggle (possibly because the bolts underneath encourage them to stay in place).
This was a time-consuming project, but not outrageously expensive:
• filing cabinet: $11.25 on sale at St. Vincent dePaul
• handle parts: $5 or so, total, used from Bring
• casters: $4 total, on super sale at Harbor Freight for $1 each
• bolts + nuts: $5 or so, including bolts from Bring, nuts from the hardware store
• coarse sandpapers and sanding block: $6
• orange stripping gel spray: $9
• Scotch Brite pads: had on hand
Ultimately the sandblasting kit and media weren't necessary or useful for this project, so I'm leaving them off the materials list. In lieu of a powerful air compressor/sandblaster combination, what you really need to finish something like this is a whole mess of elbow grease.
Thanks for sticking with me through the many, many words and pictures! I'm really pleased with how it came out, in case you couldn't tell. Now I can start obsessing over something else on Pinterest.
Linking up to:
My Repurposed Life
The Cottage Market
As you might recall, a few weeks ago I started cleaning my room, realized we needed a full-sized file cabinet instead of a bunch of file boxes, and got sidetracked from the room cleaning project while I finished making it over . . .
. . . into this bare steel industrial-style cabinet. I don't mind having it in my house, even though it's full of boring papers and responsibility.
It's not just me, right? This is a little like when Eliza Dolittle turns out to be a stunner. (The rain in Spain is falling mainly on the plain, am I right?) Or like when Rachael Leigh Cook takes off the glasses and Freddie Prinze Jr. realizes she's Superman?
I really like the way this turned out.
When I last wrote about this cabinet, I'd stripped and sanded the main body and managed to get most of the paint off. I decided to keep the paint that remained after hours of palm sanding (aka: clanging and waking the neighbors) and I'm pretty happy about it. The black paint in the rivets, dents, and folds makes me happy.
Then I attached the casters, bought new from Harbor Freight on super sale. I had first searched the big bin o' casters at Bring and came up a couple short of a matching set, sadly. I like to check there first then follow up elsewhere. I don't always find what I need on the first try, but when I do, it's always worth the search.
I flipped the cabinet, exposing its rusty underside . . .
. . . and used the casters to mark where to drill the holes.
Once the holes were drilled and the filings swept away, I used three little bolts and three little nuts to attach each caster to the cabinet (the fourth hole won't fit on the frame).
And then, with all of the wheels attached, I flipped it upright and the easy part was done.
I say that because this next bit was kind of a trial.
I really wanted bare steel fronts until I started sanding the first drawer with the palm sander. It was slow, noisy work that reminded me (negatively) of sanding the cabinet (clangity clang clang!). I thought I might prime + chalkboard the drawer faces instead. And it was a bad idea.
I'd just finished removing all of that black paint from the rest of the cabinet and I didn't at all like it on the drawer fronts. The paintbrush marks didn't appeal to me, either, so I switched courses (after everything was painted, unfortunately) and decided to try sandblasting.
After a few days of waiting and gathering supplies, here's one attempt with the sandblaster + walnut shell media + 30 minutes. Look at how it's not even breaking through the original wood patterned paint. Awesome.
I switched to using sand as media and had an easier time of it, but really, our air compressor is just too wimpy for sandblasting.
I decided to try the orange paint stripper again and actually had pretty awesome luck with it. You can see here the less reflective (darker) areas where, after an hour or so of sandblasting, some of the paint came off. The lighter areas are where the paint stripper did it's thing, and then I did mine with a Scotch Brite pad, a sanding block, and some steel wool.
It took a bit of work to get the finish even, but only on this one drawer. The others hadn't been sandblasted yet when I moved on to paint stripper.
Handles were next! I shared a photo of seemingly random bits of metal hardware in the previous post; they weren't random after all, at it turns out. I used some of those pieces to make four new handles with the character I wanted.
I made the handles from some blank metal outlet plates and what I think were probably sliding screen door handles in a former life. This was my favorite part of this makeover, and the thing I think added the most to the piece. (I bought the light switch plates, too, unsure of which combination would work out. These cost between twenty-five and fifty cents at Bring, and I'll be able to find another use for them so I wasn't concerned about over-purchasing.)
I drilled holes through the old handles, using the blank outlet plates as templates. Little bolts and nuts joined them together to make a nice flat surface for the final piece.
After drilling one more hole and applying one more bolt per drawer, the handles are complete. When well-tightened, these don't shift or wiggle (possibly because the bolts underneath encourage them to stay in place).
Here it is, back in one piece, exuding awesomeness and making paperwork look a whole lot less 1980s-style boring.
This was a time-consuming project, but not outrageously expensive:
• filing cabinet: $11.25 on sale at St. Vincent dePaul
• handle parts: $5 or so, total, used from Bring
• casters: $4 total, on super sale at Harbor Freight for $1 each
• bolts + nuts: $5 or so, including bolts from Bring, nuts from the hardware store
• coarse sandpapers and sanding block: $6
• orange stripping gel spray: $9
• Scotch Brite pads: had on hand
Ultimately the sandblasting kit and media weren't necessary or useful for this project, so I'm leaving them off the materials list. In lieu of a powerful air compressor/sandblaster combination, what you really need to finish something like this is a whole mess of elbow grease.
Thanks for sticking with me through the many, many words and pictures! I'm really pleased with how it came out, in case you couldn't tell. Now I can start obsessing over something else on Pinterest.
Linking up to:
My Repurposed Life
The Cottage Market
Thursday, April 25, 2013
love 'em and leave 'em: thrift store finds left behind
In case anyone labors under the mistaken impression that I bring home everything I like from thrift stores and estate sales, I occasionally like to show-and-tell some of the stuff what didn't get brought.
Let's start with a French pressure cell press. My love for industrial machinery knows no logic, but at least I talked myself out of actually bringing it home. And it's a good thing; I don't need any membranes disrupted.
This mid-century lamp is interesting to me. What's that screened bit for in the middle?
It's hinged, so something can be put inside, but what? Incense? Spare bulbs? Is it an ashtray? Intriguing. But I don't need more lamps right now.
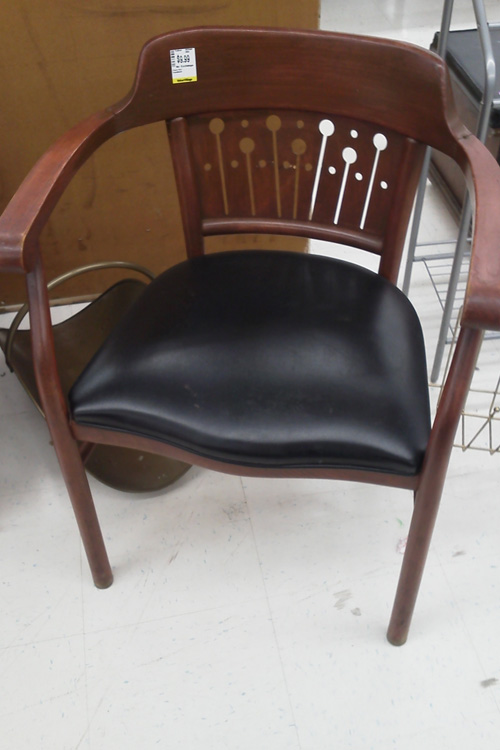
Love these chairs. Love them. Except for the upholstery. Just two problems: 1) We have enough chairs. 2) Even if I'd brought home the pair of them, the arms (I love the arms!) would make them unsuitable for using at the dining room table. The kitchen/dining room is on the small side, and these wouldn't scoot in, making for less room to maneuver around them.
More industrial equipment. I love the name "Cleantron".
Someone put a papasan chair on top of this antique table. Of course, at this particular store, they also write prices inside of antique books in pen, so it's not really too surprising.
I love the way this thing was built. It's gorgeous, and probably legitimately an antique. It was also pretty big. We have a train table in our living room at the moment, though, and by the time I thought of using it as a patio table, someone else had snapped it up. I think it was $7.00 or something. Will it haunt me till the day I die? No, but probably for another few weeks, anyway.
Ooh! Staircase shelves! These would work well with a bunkbed, I think. Traffic was brisk the day I went in; someone swooped in an left with one of the pair about ten minutes after I snapped this picture.
Oddly attracted to this, or the legs anyway. The top had a cheap looking veneer, but I did love the legs.
I used a couple of valets as t-shirt displays at the bookstore, back in the day. I still have one of the pair, in fact, but I've never seen one built as part of a chair.
I can't remember what the project was, but something I saw on Pinterest made me shoot this picture of a 2-tiered end table.
Last but not least, a little polka-dot chair. Probably a contemporary piece, but maybe from the late 40s or early 50s. I'd sit in it.
And there you have it! See, I told you I didn't buy every cool thing I see!
Thanks for reading!
Wednesday, March 20, 2013
thrift finds: campaign dresser and yellowstone pennant
The bedroom is in a transitional stage (urgh, the walls . . . look away . . . LOOK AWAY!), but I wanted to share this vintage campaign-style dresser and Yellowstone National Park pennant I picked up at an estate sale a couple of weeks back. The dresser came with a mirror, too, though I haven't found a place to put it yet.
The dresser set somehow survived until Sunday and I put in a bid on it, since there were no other takers. To my surprise I won (it was too low for what the dresser is worth, but I couldn't justify budgeting more), and eventually we made the decision to get rid of my husband's old 1990s oak veneer dresser and put this one in its place.
I cleaned up the dresser and papered the drawer bottoms with old nautical charts, but otherwise, I'm waiting on making changes or updates.
I've seen a lot of painted or refinished campaign furniture on Etsy and Pinterest, but I kinda like the speckled wood stain. Link up in the comments section below if you've seen a campaign furniture makeover I need to see before making up my mind.
I love the pennant a ton. It's screen-printed wool felt and probably dates to the 1940s. The only way it could be better is if it were from Glacier (where we visited this summer).
Eventually, I'll get the walls replastered, primed, and painted and I'll give you a look at the finished room . . . but honestly, a foot on all sides of these photos is kind of a disaster area right now, so it'll probably be awhile.
Thanks for reading! Any unexpected thrift scores of your own lately? Do tell! I love following your (non-spam) links to look at pretty stuff.
p.s. you can make these photos larger simply by clicking on them, but you probably already knew that, clever you!
Linking up to:
Labels:
brass,
campaign,
dresser,
estate,
furniture,
hardware,
national,
park,
pennant,
vintage,
wood,
yellowstone
Subscribe to:
Posts (Atom)