Showing posts with label birthday. Show all posts

Thursday, February 6, 2014

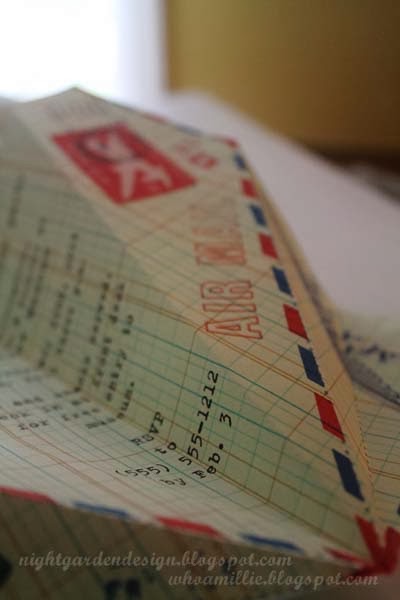
paper airplane party invitations


Printed on vintage accounting ledger paper.

Airmail graphics for label and stamp are from The Graphics Fairy, and were printed separately on label paper and attached to the airplanes like stamps. ("6 cents" was changed to "4 cents" in Photoshop.)

Postmark is a combination of several glyphs from a font called Dead Letter Office available free from daFont, altered in Photoshop.

Text typeset in Helvetica (all caps, outlined) and Trixie.

I had brainstormed ideas for invitations for my kiddo's Flying Machines party and came up with the idea of a paper airplane invitation that looked like Air Mail. A quick search revealed that it's not a unique idea. Boo hiss. I used this design from Country Living Magazine as a template for my planes, although the result is pretty different.

If you like these but don't want to invest the time to create your own, please e-mail me. I can create a version with your child's name and party details for a reasonable rate, with a 3-day turn-around.

Thanks for reading!


Thursday, October 10, 2013

c is for chasmosaurus


After last week's craft fail, it was nice to have a couple of craft successes. This is one!


This chasmosaurus shirt is part of our gift for an upcoming birthday party this weekend (second part to be featured here, soon!). Our little friend is a big-time dinosaur enthusiast.


Those of you without a Silhouette cutter will be happy to know that this was made without one. I used freezer paper and an X-Acto blade, after first designing the image in Adobe Illustrator. Free dinosaur graphics are everywhere on the internet, though, so it's possible to do this project with other dinosaurs, without Illustrator. Chasmosaurus fans can use this design for your own personal projects (not for sale!).

You can print directly on the freezer paper. Cut it to fit your printer and make sure you'll be printing on the textured "paper" side, not the slick plastic side.

To save ink, I turned the opacity down to 30% so that it would print a light gray instead of black. You could also just print the image in outline, but I like to have a filled-in figure for whatever reason.


After it's printed, cut it out with an extra-sharp X-acto blade on a self-healing mat or a surface you don't care too much about (like an old magazine or a drawing board). The sharpness of the blade is especially important for those tiny letters.

Then iron it on your shirt and paint using a short-bristled brush! As I've mentioned before, the beauty here is that kids can help with the painting part. My kiddo helped paint this for his friend, so the gift is really from his own two hands.


Here are some of my previous freezer paper stencil projects, in case you'd like some more ideas or a bit more step-by-step.


Thanks for reading!

p.s. you can make these images larger just by clicking on them . . . but you probably already knew that, clever you.

Friday, July 19, 2013

golden book baby shower invitations


I recently offered to throw a baby shower for a good friend of mine, and because this will be her second child and she already has a house full of hand-me-downs, she requested that the gift giving be kept to a minimum. Partially because of that request (and partially because she's a book lover like me) I settled on a "vintage / classic kids' books" shower theme.


The invitations went through an extensive brainstorming and planning phase, after which I finally decided to use vintage Golden Books as the base.


This may not be a new idea entirely; since landing on the concept I've seen a few different versions of Golden Book baby shower invitations. A few use just the covers, discarding the pages.

Yikes. As a book lover throwing a party for a book lover, that idea makes me throw up in my mouth a little. Admittedly, I have that response to pretty much any project I see people blogging about when it involves chopping up vintage books, even having worked in bookstores and witnessed what happens to mass market paperbacks. Or maybe because of it.

Anyway, I trolled St. Vincent dePaul's section of kids' books to find some classic titles in older editions with a bit of age to them. Because the guest list was small, I didn't mind that each of the books was different, but this project might be a little extreme for a guest list of more than a dozen.

Of course, Baby Animals was pretty perfect for this project, but really, nearly any Golden Book can be altered to make the perfect invitation (as shown above).


Using my YA Library Book Slips fabric design as a base in Adobe Illustrator, I designed and printed out some library check-out slips on manila card stock using the family's last name (Geisel, in this case, is a pseudonym) in place of the author and "The New Baby" as the title.  These were the "registry" info cards, except in this case they included language inviting people to forego traditional registry gifts in favor of vintage kids' books or small handmade items.


The little envelopes to hold the cards inside the books are made of the same card stock trimmed, folded, and held in place with GlueDots. (If you can't find manila card stock, do what I did and cut some manilla file folders down to 8.5 x 11" sheets using a paper cutter.)


I scanned the front cover (inside and outside) to alter slightly in Photoshop.

For the fronts, I added on each book the words "& Baby Geisel" to the title, matching the the title font and wear pattern as closely as possible.


For printing on the reverse, I moved up the bookplate and made the endpaper pattern fully repeat, before layering on the text in a font similar to the Little Golden Books font. (Click to zoom for detail.)


Printed and trimmed . . .


. . . then scored along the spine and ready to attach . . .


. . . with three glue dots.


I used washi tape tabs to indicate where to open the books . . .


. . . and used more washi tape (white and yellow, so the golden spines still showed through a bit) to cover the spines. Then I tied them up with baker's twine and put them in some shipping envelopes to ready them for mailing (complete with logo for the Geisel Family Library Foundation).


Repeat for all titles.


This project is, admittedly, a bit labor intensive and requires some knowledge of Adobe Photoshop and Adobe Illustrator. Like the look but want to skip the work? I can put some together for you, too! Contact me for pricing and scheduling by leaving a comment below, or by e-mailing (whoamillie (at) thenightgarden.com).


Thanks for reading!

p.s. you can make these photos larger simply by clicking on them, but you probably already knew that.

Saturday, March 16, 2013

the inventor's supply kit


I was recently looking for a couple of birthday presents for two sweet kids in my family. One, a girl turning eight, is very artistic. Arts & crafts kits for kids her age (especially those targeted at girls) are pretty easy to find, and I'm told she loves these things. I found two (one; two) I thought she'd adore and wrapped them up in a pretty fabric sack I'd made (tutorial coming soon).

The other, a boy turning eleven, was harder to shop for. He's also creative, and has a particularly curious mind when it comes to engineering gadgets and finding out how stuff works. This always impresses me about him.

It's somewhat difficult to find a ready-made kit for someone like him. A lot of science-y kits (even the more expensive ones) cheap out on the supplies, or only provide enough for a limited number of experiments one time through. I don't think that's the best way to encourage the kind of experimentation that engineering and inventing require. Obvious answer: to make an Inventor's Supply Kit of my own invention.


As a pre-internet kid, books were where I always found my answers when I was little. So I found a couple of books I thought would inspire a ton of ideas in his mad-scientist head, and collected a bunch of stuff he'd need to do most, if not all, of the projects in the books. Ta-da! Instant kit.


Well, I mean, not totally instant. You know me. I had to make it look "legit". I also reused one of those nice shipping boxes with the red interior that came with a photo book from MyPublisher, and made some graphics and wrapped everything up in brown paper (reused packing from a box someone shipped me) with stickers and striped tape. But mostly instant.


The first book, Kinetic Contraptions, requires hobby motors, which are pretty cheap from on-line retailers until you add in shipping costs. I headed to the thrift store and bought a couple of cheap motorized cars someone had donated. Then I disassembled them and salvaged the motors (full disclosure: the Mister helped loosen some crazy-tight tiny screws). As a bonus, this also yielded a supply of tiny screws, several wheels and axels, gears, and an LED lighting and speaker assembly, all of which are harder to come by than hobby motors.


Some kids would appreciate the opportunity to do the disassembly themselves, but I didn't want to leave any obstacles between the recipient of our gift and the projects in the book. Better, I decided, to give him raw materials to build with from the ground up. He can always pull apart old toys later to salvage more parts if he wants to.


Most of the other supplies came from the dollar store or were pretty inexpensive elsewhere. Here's a list of what I put in the kit (also printed on the graphic inside the box lid):

• 2 hobby motors (from RC cars)
• 1 speaker/light assembly (from an old RC car)


• assorted tiny screws
• straws
• bamboo skewers (with the sharp points cut off; I'm creative, not crazy)
• 4 film canisters (from a bunch of rolls of camera film I picked up for my old-timey 35-mm at the thrift store)
• assorted RC car wheels
• wire (leftover from another project)
• 8 AA batteries (the book recommends dollar store batteries, since things are bound to be left connected accidentally, and good batteries drain just as well as cheap ones)


• 36 spring-clamp clothespins
• 3 D batteries (see above)
• 2 spools of electrical tape
• 250 plastic-coated paperclips (which can always be stripped down if the project calls for it)
• 12 binder clips
• spare gears and wheel axels (from old RC cars)
• brads and decorative metal gears
• glue sticks
• rubber bands


I also used a part of a roll of striped orange paper tape from Target's stationary aisle, reused some brown kraft packing paper, and printed some labels on some label paper.


If you find yourself wanting to make one of these kits for a scientist or inventor in your family, I can totally send you a PDF of the graphic for the box top (for personal use only, of course, not for resale). Just send me a message via e-mail or in the comments field below and I'll hook you up!


Thanks for reading!

p.s. you can make these photos larger simply by clicking, but you probably already knew that, clever you!


Linking up to:


Friday, March 1, 2013

robot party favors + treat sacks


Time for more robot party fun! Today, I'm going to show you the party favors we put together for the kiddo's third birthday party. (You can find the robot cake post and a piƱata post here and here.)

The favor bags are really simple. You'll need some silver-colored bags with handles, and some of this paper tape from the stationary aisle at Target.


I also used the circles I cut out of the party invitations (post coming soon!) cut in half for the eyes.  No tutorial required, just some glue dots (for the eyes) and scissors.


I had planned to use googly eyes on these, but some of the guests were under three years old. You can make all of your bags look the same if you want; I made each of our robot favor bags different.  Fun and smiley!


We left the bags mostly empty except for these sticker sheets from Amazon and some robot erasers from the Dollar Tree. (Several of the kids tried to eat the erasers [thinking they were candy] so I'd nix them if I had it to do all over again.)


The kids collected other favors for their bags during the party, like these wind-up robots we found at Eugene Toy and Hobby locally. You can find them in a local toy store too, I'd bet, or you can get them on-line (I'd skip the wind-up robots at Oriental Trading Company though. We'd ordered a box and half of them were missing pieces or didn't walk, and the rest broke really easily. Ditto the replacements they sent.).  


I made this silver-glittered Play-Doh using some party packs of Play-Doh I picked up after Halloween. 


I made the silver color by mixing the following colors with silver glitter and dividing into five containers: 2 white, 1 black, 1 green, 1 purple. 


To finish them off, I taped each one with the paper tape and labeled them with a fine-point Sharpie.


To make the robot candies, I found a robot candy mold  and cast three different recipes: gummies (using this recipe from Skip to My Lou; you can see the blue mix cooking in that photo above), chocolate butterscotch, and chocolate peanut butter (both by melting chocolate chips with either butterscotch chips or peanut butter chips).


I designed the packages in Adobe Illustrator, and stapled everything together with green staples.


The jelly bean packages were easier. I bought mixed beans in bulk and separated out the yellow/green/blue ones.


If you want a copy of the PDF file so you can print your own wrappers, leave me a comment below or send me an e-mail, and I'll get a copy to you.


With most party themes, there's a way to mix handmade and store-bought party favors to maximize budget and really personalize. The trouble I ALWAYS have is knowing how to plan my time well so that I'm not frazzled by the time the party rolls around.

Any time management tips? How do you narrow down party ideas and decide what to leave out?

Thanks for reading!

(p.s. you can make these images larger just by clicking on them, but you probably already knew that. clever you!)