Inspired by the 2012 animated short Paperman and all the flying machine party prep, I made this watercolor pencil art.
It happened to be ready weeks before Valentine's Day, too! I hope yours was lovely.
Showing posts with label paper. Show all posts
Tuesday, February 18, 2014
Thursday, February 6, 2014
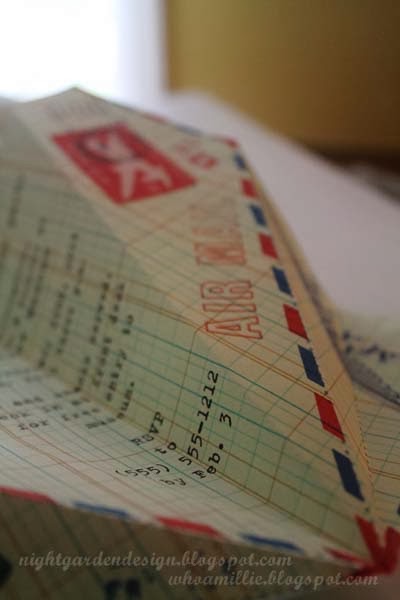
paper airplane party invitations
Printed on vintage accounting ledger paper.
Airmail graphics for label and stamp are from The Graphics Fairy,
and were printed separately on label paper and attached to the
airplanes like stamps. ("6 cents" was changed to "4 cents" in
Photoshop.)
Postmark
is a combination of several glyphs from a font called Dead Letter
Office available free from daFont, altered in Photoshop.
Text typeset in Helvetica (all caps, outlined) and Trixie.
I
had brainstormed ideas for invitations for my kiddo's Flying Machines
party and came up with the idea of a paper airplane invitation that
looked like Air Mail. A quick search revealed that it's not a unique
idea. Boo hiss. I used this design from Country Living Magazine as a template for my planes, although the result is pretty different.
If
you like these but don't want to invest the time to create your own,
please e-mail me. I can create a version with your child's name and
party details for a reasonable rate, with a 3-day turn-around.
Thanks for reading!
Tuesday, October 22, 2013
rubber eraser wrapping paper printing
For the dinosaur-themed birthday presents I mentioned back in the chasmosaurus t-shirt post, we wanted a little dino-themed paper for wrapping.
Among the many craft supplies I had laying about were some Pink Pearl erasers and some accounting-style graph paper from the Goodwill. Combined, they made some Jurass-tastic gift wrap!
I used an X-acto knife to cut one side of the eraser to look like a brachiosaurus . . .
. . . and cut a prehistoric palm tree onto the other.
Then the kiddo and I got out the washable stamp pads and stamped blue dinosaurs and green trees all over the graph paper. I guided his hand a bit to keep a pattern going, but a couple of randomly printed sheets turned out pretty nice too.
I accented with some pens and wrapped up the gifts (a t-shirt, as previously mentioned, and a hat I'll be blogging about soon). I also drew some little tags to go with each gift. One of these days I'll remember to photograph every part of a process; that day is not today.
And there you have it! Some fancy wrapping paper you can whip up for any occasion with stuff you probably already have.
Thanks for reading!
Thursday, October 10, 2013
c is for chasmosaurus
After last week's craft fail, it was nice to have a couple of craft successes. This is one!
This chasmosaurus shirt is part of our gift for an upcoming birthday party this weekend (second part to be featured here, soon!). Our little friend is a big-time dinosaur enthusiast.
Those of you without a Silhouette cutter will be happy to know that this was made without one. I used freezer paper and an X-Acto blade, after first designing the image in Adobe Illustrator. Free dinosaur graphics are everywhere on the internet, though, so it's possible to do this project with other dinosaurs, without Illustrator. Chasmosaurus fans can use this design for your own personal projects (not for sale!).
You can print directly on the freezer paper. Cut it to fit your printer and make sure you'll be printing on the textured "paper" side, not the slick plastic side.
To save ink, I turned the opacity down to 30% so that it would print a light gray instead of black. You could also just print the image in outline, but I like to have a filled-in figure for whatever reason.
After it's printed, cut it out with an extra-sharp X-acto blade on a self-healing mat or a surface you don't care too much about (like an old magazine or a drawing board). The sharpness of the blade is especially important for those tiny letters.
Then iron it on your shirt and paint using a short-bristled brush! As I've mentioned before, the beauty here is that kids can help with the painting part. My kiddo helped paint this for his friend, so the gift is really from his own two hands.
Here are some of my previous freezer paper stencil projects, in case you'd like some more ideas or a bit more step-by-step.
Thanks for reading!
p.s. you can make these images larger just by clicking on them . . . but you probably already knew that, clever you.
Labels:
birthday,
boy,
chasmosaurus,
cheap,
dinosaur,
freezer,
gift,
girl,
inexpensive,
paper,
preschooler,
present,
shirt,
stencil,
toddler
Friday, April 12, 2013
freezer paper stencil toddler art pretzel t-shirt
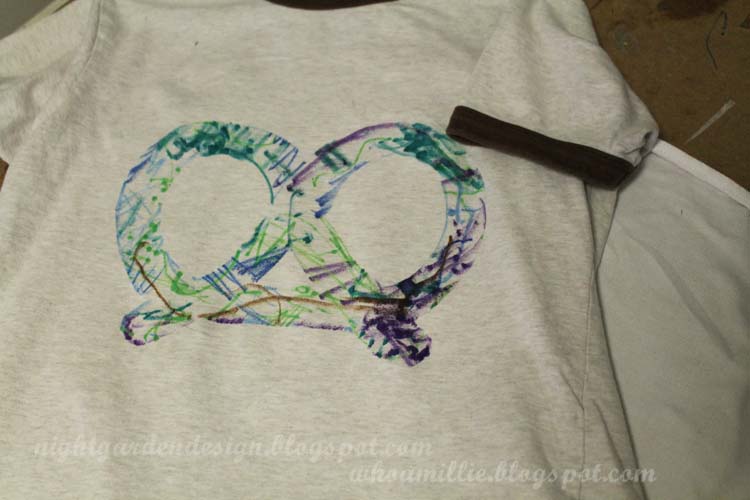
My kiddo is less familiar with the 1960s than with pretzels, so it wasn't really too surprising when he pronounced the glittery, neon pink "peace sign" shirt a "pretzel shirt" and said he wanted to wear one. I thought something like that might make a nice project for one of the blank t-shirts we've picked up recently, so we headed home to make our own pretzel shirt.
Really, though, this would make a nice project for whatever image your kid wants. And the best part is that it's a great project for even little kids to help with, which means you're not trying to work on it by yourself while your kiddo is pulling at your sleeves.
You can take a peek at one of my previous freezer paper stencil projects (1 and 2) for the basics if you're not familiar with the freezer paper stencil process. Basically, cut a stencil from freezer paper and iron it on. For this project, we also used Crayola's fabric markers (previous freezer paper stencil projects here used acrylic paints and Tee Juice pens).
Because I planned on the kiddo doing most of the coloring, I covered as much of the t-shirt as possible with freezer paper to prevent color from ending up in unintended places. You'll also want to put a piece of cardboard inside the shirt to keep color from seeping through to the back if (like me) you have an enthusiastic marker-wielder.
I let the kiddo pick the colors and tried to encourage him to make sure a lot of color made it onto the shirt rather than the paper . . . but yeah, that's pretty much a losing battle, so I surrendered early. After removing the stencil and heat-setting the design, we were done.
And here it is, finished! We were both pretty happy with the way it came out, although I think if I were to repeat this project, I'd outline the shape completely first so that any areas with lighter coverage wouldn't blend into the background quite so much. But I think that even without that step, this was a nice collaborative project. He got to color on a shirt, and I got to help make sure it looks like a pretzel.
Thanks for reading! What projects have you been doing with your toddlers lately? We're always looking for fun projects that keep well (read: don't have to be tossed out after a week).
p.s. you can make these photos larger by clicking on them; but you already knew that, clever you.
Thursday, January 31, 2013
recycled paper chains
Phew! It's been quiet around here lately, hmmmm? The So You Think You're Crafty competition has been keeping me busy during the hours I'm not hanging out with my kid, or designing book covers, or making robot party stuff, or, you know, sleeping.
It's Upcycling theme week over at So You Think You're Crafty, and I'll get to post my project here tomorrow since voting ends tonight; I think you'll like it.
In the meantime, here's an easy little project you can use to recycle (or, more properly, reuse or upcycle) some envelope liners, paper sacks, and wrapping paper into decorative paper chains.
Using scissors or a paper cutter, cut your envelope liners and wrapping paper into strips. I used strips about 3/4 inches wide and 9 inches long for these Christmas chains, but if you want to use wider strips, just try to keep them under a couple of inches wide so you won't have any trouble linking.
After you've made one circle (using glue dots or double-sided tape to connect the ends), just loop the next strip of paper through the circle and start making your chain, just like you did with construction paper back in grade school!
Keep going until you have plenty of length. Like with most party or holiday decorations, multiples look better than singles, so go all out. Spend a couple of afternoons and you'll be able to make a few 25-foot lengths. When the party's over, you can save your chains for next time or put them in the recycle bin.
The chains in these photos were some we made at Christmas, but you can make them for any holiday or for party decorations. If you have a specific party theme or color you're aiming for, you can accent with some rings made of construction paper or scrap-booking paper, while still keeping most of the rings recycled. It makes for a really cool look that's easy enough for even really little kids to help make.
Thanks for reading!
It's Upcycling theme week over at So You Think You're Crafty, and I'll get to post my project here tomorrow since voting ends tonight; I think you'll like it.
In the meantime, here's an easy little project you can use to recycle (or, more properly, reuse or upcycle) some envelope liners, paper sacks, and wrapping paper into decorative paper chains.
Using scissors or a paper cutter, cut your envelope liners and wrapping paper into strips. I used strips about 3/4 inches wide and 9 inches long for these Christmas chains, but if you want to use wider strips, just try to keep them under a couple of inches wide so you won't have any trouble linking.
After you've made one circle (using glue dots or double-sided tape to connect the ends), just loop the next strip of paper through the circle and start making your chain, just like you did with construction paper back in grade school!
Keep going until you have plenty of length. Like with most party or holiday decorations, multiples look better than singles, so go all out. Spend a couple of afternoons and you'll be able to make a few 25-foot lengths. When the party's over, you can save your chains for next time or put them in the recycle bin.
The chains in these photos were some we made at Christmas, but you can make them for any holiday or for party decorations. If you have a specific party theme or color you're aiming for, you can accent with some rings made of construction paper or scrap-booking paper, while still keeping most of the rings recycled. It makes for a really cool look that's easy enough for even really little kids to help make.
Thanks for reading!
Saturday, January 5, 2013
freezer paper stencil viking t-shirt
I had a falling out with the owner of a local shop recently. I'd gone there to buy a specific t-shirt for my kiddo, one with a cuuuute viking pattern screen printed on it by a company I like, but can't always buy (because good sense dictates that I don't buy too many $30 toddler t-shirts).
But I left without it.
It's all too bad because I like to support local business when I can (even if it means waiting for a sale) and I especially like to support mama-owned businesses. More than that, I like to support good graphic designers, and this particular clothing manufacturer hires great ones.
In the end, though, the idea of stenciling a viking design onto a t-shirt isn't copyrighted. In fact, this tutorial that Cheri wrote over a year ago could have inspired the (more recent) designer t-shirt, for all I know. I know it inspired me!
Freezer paper stenciling is something I've posted about before, but this viking design is a whole lot less complex. As you can see, I made it in two different sizes, one for the mister and one for the kiddo.
I also (word to the wise) accidentally cut it into wax paper the first go-around (which DOES NOT WORK, and I knew it) and had to re-do it, so it's a good thing it's so straight-forward.
Cheri mentions in her tutorial that you can find some free-use images on-line and cut them with your Silhouette cutter; you'll be happy to know you can also free-hand the drawing and cut it out with a craft knife if, like me, you're artsy and don't own a Silhouette. You can see my pencil lines on the paper in this next photo.
Cut on FREEZER paper, iron onto t-shirt (plastic side down), paint, and let dry.
If your beard is too close to the color of your shirt, lighten it up, dry again, and remove the wax paper.
Heat set, and you're ready to go!
I used a Gap t-shirt from the Goodwill for this design, so the project was really inexpensive and fast. And we like it! I hope you'll link to your freezer paper stencil projects in the comments section below, if you have the urge!
Happy New Year, and thanks for reading!
Sunday, December 2, 2012
freezer paper stencils + flour sack towels
The night before my sweet cousin's wedding, I had a major 11th-hour craft fail in my family's hotel room. My screen printing project fell all to pieces.
Returning home after the wedding, I dusted off my butt and set aside the silkscreen for awhile, turning instead to freezer paper stencils to make my cousin and her fiance' a set of personalized, woodsy kitchen towels.
Supplies: freezer paper, craft knife, brown Tee Juice dauber, + iron. And, not pictured, cotton tea towels and pencil.
Sketch your design onto the dull, unplasticized surface of the freezer paper, then cut it out with your craft knife. I chose to print one of the towels with a woodgrain pattern and a "carved" heart with their initials inside. I drew this freehand, but if you're not sure where to start, you can find images on-line to inspire your pencil.
A more involved design like mine will require careful handling and ironing.
Iron the stencil on to towels carefully, adding separated elements (like the letters in the "carved heart") after everything else.
Using the Tee Juice dauber, go over the entire design.
After letting it dry for awhile, remove the freezer paper and iron the entire piece to set the dye. Wash and dry, then iron flat.
The second design was the same process but a different graphic: a stand of trees, their state, and their initials.
Thanks so much for reading! Wanna make the photos larger? Just click!
Linking up to:
Six Sisters
Be Different, Act Normal
Subscribe to:
Posts (Atom)