Monday, April 7, 2014

mini art kit

A recent car trip highlighted the need to have various distractions for the kiddo in my bag at all times. I wanted a stash of compact little things to fit in there that won't add too much extra bulk, but will keep him entertained in a restaurant, in the back seat, or in a yurt during an overly rainy overnight trip to the beach. Not that I'm speaking from experience or anything.


An empty mint tin is a great way to organize a few art supplies, including a couple of those crayons that restaurants sometimes give out.

I also added a couple of short colored pencils, some neon posterboard cut to size, and a sheet of stickers sent to me as part of an advertisement. (Kids magazines sometimes send them out to tempt us to subscribe.)


When cutting the posterboard, I made sure to leave an inch of space at the end and a textured edge to make it easier to remove from the box.


And there is is! A mini art kit perfect for stashing in your bag, next to a Hot Wheels car and a travel-sized packet of Play Doh.

I know it's really the Boy Scout motto, but I think I'm going to adopt "Be Prepared" as my own.

Thanks for reading!

Tuesday, March 18, 2014

the cat in the hat mini hats

A couple of factors played into the lack of activity at the blog over the past couple of weeks. First, I was scrambling to finish up the last few costume projects before our preschool's all-parent production of The Cat in the Hat. A few late nights, some scavenging for materials, and a couple of re-dos later, and everything came together. It was a pretty amazing group of people who came together on the project.

Second, my computer died. Like, completely. I took it in with a blank white screen with only a gray apple in the middle, and when it came back to me a little over a week later, they'd replaced the hard drive and the logic board. Thankfully, luckily, magically, there was a week left on the AppleCare extended warranty the Mr. had the foresight to buy. A week later, and we'd have been paying out-of-pocket for the parts and repairs. And it would have cost about as much as I earned on Etsy this year. I feel really lucky.

Anyway, on to today's post.


Let's look at making some Cat in the Hat mini hat headbands!

You can use this idea for making any kind of mini top hat, really, just by changing the color of the stiffened felt and adding some embellishments. Here's what you need to know.

Materials for two hats:

1 12 x 18-inch piece of stiffened felt (also called Friendly Felt) in white or glittered white
2 9 x 12-inch pieces of regular red felt or glittered red felt
red and white thread
hot glue
2 red ribbon-covered headbands


For each hat, cut a piece of stiffened white felt that's 4 1/2 x 12 inches, and three red stripes that are approximately 1 x 12 inches. You'll also need a red circle that measures approximately 3-inches in diameter, and two stiffened white circles (not one red + one white, as photographed) measuring approximately 4 1/2 inches in diameter.

Arrange stripes as shown, then stitch in place using red thread.

Using the red circle as a guide, pin the striped felt into a tube that will use the red circle as a top. You can either pin it inside out to machine stitch and turn carefully right side out again, or you can pin right side out and hand stitch using a mattress or a slip stitch. Both ways will work.
 
After pressing that seam to make sure the tube retains its round shape, sew the red circle to the top using red thread to whip stitch it in place.


Center the hat's top on one of the white circles, then use red thread to whip stitch it in place.

Hot glue the hat to a headband, then cut slots on either end of the remaining white circle to accommodate the head band (as photographed).


Line the circle up with the underside of the hat and the headband, then hot glue in place. Make sure to use lots of glue on the headband, and a scant amount of glue on the white felt so that it doesn't leak through. Then whip stitch to the hat and you're done!

Use similar materials for Mad Hatter or steam punk style hats! Switch to black or brown felt and headbands, and add feathers, ribbons, and other embellishments. And then send me a link so I can see what you've made!

Thanks for reading!

p.s. you can make these photos larger by clicking on them for more detail!

Tuesday, February 18, 2014

paperman inspired love

Inspired by the 2012 animated short Paperman and all the flying machine party prep, I made this watercolor pencil art.


It happened to be ready weeks before Valentine's Day, too! I hope yours was lovely.


Thursday, February 6, 2014

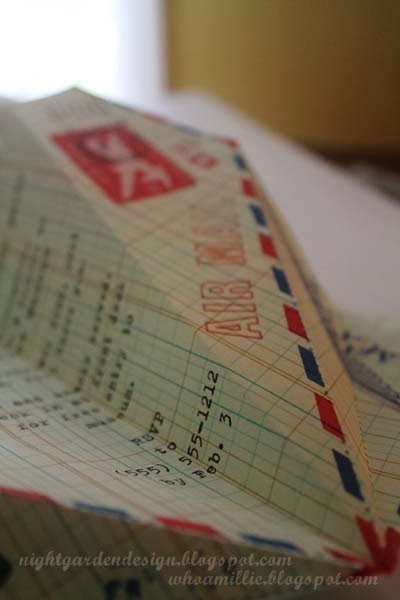
paper airplane party invitations


Printed on vintage accounting ledger paper.

Airmail graphics for label and stamp are from The Graphics Fairy, and were printed separately on label paper and attached to the airplanes like stamps. ("6 cents" was changed to "4 cents" in Photoshop.)

Postmark is a combination of several glyphs from a font called Dead Letter Office available free from daFont, altered in Photoshop.

Text typeset in Helvetica (all caps, outlined) and Trixie.

I had brainstormed ideas for invitations for my kiddo's Flying Machines party and came up with the idea of a paper airplane invitation that looked like Air Mail. A quick search revealed that it's not a unique idea. Boo hiss. I used this design from Country Living Magazine as a template for my planes, although the result is pretty different.

If you like these but don't want to invest the time to create your own, please e-mail me. I can create a version with your child's name and party details for a reasonable rate, with a 3-day turn-around.

Thanks for reading!


Saturday, February 1, 2014

chevron wedding quilt (part two)

Pinning the quilt (started this summer, last mentioned here in November, finished very recently), took a little more than four hours and seven hundred pins, which wasn't much considering I worried about how to do it for a month.


I was lucky enough to have a more quilt-experienced friend to advise me to move my furniture and tape the backing to the floor super-taut. I used high-tack blue masking tape to stretch it a bit at a time, then layered and smoothed the batting and the top into place.


I pinned starting near the center, then towards the margins in quadrants, a pin in each seam and corner, and more along the edge.


Anyway, that's it for now. Anyone struggling with how, exactly, a gigantic, room-sized quilt gets pinned together in the middle of the night before a preschooler can ix-nay the ork-way, now has a bit of a heads-up, complete with nighttime photos.


More soon! Thanks for reading.