Sunday, June 8, 2014

little spoon sunburst mirror

Awhile back, I made a sunburst mirror out of recycled bits and silver spoons from the thrift store. My mom liked it so much that she specially requested one of her own, but smaller.

Well, it took me awhile to dig up enough baby and souvenir spoons at junk stores and yard sales, but I finally did it, just in time for her birthday this year!


It's a quick project once you have the materials. The mirror is a plastic-backed utility mirror I found at Bring, and I admit that I just hot-glued the sixteen little spoons directly to the back. Those that had dangly bits or handles that were too long or two wide were cut with tin snips first. Oh! And I alternated fronts and backs for some added interest.


I had a partial sheet of adhesive felt furniture pad that makes a good backing. It's thick, so the spoons won't be sitting directly on the wall, and soft so nothing scrapes. The hanger is made from a plastic coated paper clip sunk into the felt with the ends bent back on the other side. And then, for security, more hot glue holds everything in place.

I don't usually use hot glue so liberally in projects, but there was no place on this mirror to rivet or wire the spoons in place. In situations like this (small, light projects without an extended base) it's a good choice that'll last a nice, long time.

Happy birthday, Mom! Love you a bunch.


Wednesday, June 4, 2014

mosaic stepping stones, spotted at bring

"Forget your perfect offering; there is a crack in everything. That's how the light gets in."
--Leonard Cohen


 Spotted at Bring Recycling in the garden.


Tuesday, May 27, 2014

thrift store finds: May 2014

Bring isn't exactly a thrift store, but a reuse store that features mainly building materials. But they do have a large furniture warehouse at the back and a gallery space at the front that sometimes hosts a collection of harder-to-find items or art shows of stuff made with recycled materials. Today's post features things we spied at the store earlier this month while hardware shopping for a project.

Here's a wallpaper cutter from the late 19th century.


 A gigantic Low-Voltage Circuit Tester.


An antique trunk and an accordion my kiddo was pretty set on. (I think he's convinced he could school his music teacher if only he was allowed to touch the accordion.)


Another antique trunk. This one was priced rather high, even during the 50% off furniture sale. I went back on another day and someone had tried to force the lid shut and broke the back off.


An army trunk.


A mid-century drafting table/light table/desk with brass fixtures.


And those are just a few of the cool things we spied. They also had three rows of antique theater seats and a couple of sets of lockers that somehow escaped my camera. I'll stop back in this week and snap some pictures for a future post . . . unless you get there to buy them first!

Thanks for reading.

Linking up to:
The Cottage Market

Thursday, May 8, 2014

coffee sack burlap chair upholsterly


You last saw these chairs at Thanksgiving, 2011, when I repainted and upholstered them with some whimsical sheep fabric . . . it lasted a while, but it was pretty dirty and hard to scrub clean.

I recently reupholstered them again with the front and back of a coffee sack for a little change of pace.


Easy as pie, just like last time. You'll want to fold over the edge of your burlap, though, and staple through a couple of layers to keep the burlap from warping or unraveling.


 Here are a few more coffee sack projects I've tackled:

Coffee Sack Tree Skirt
Cushion
Lamp Shade
Wall Art


And here's where you can find a coffee sack or two if you're interested in trying this at home!

Thanks for reading!

Sunday, May 4, 2014

pendleton wool blanket bunny


 I worked up a prototype bunny for a little friend's birthday, and I was pretty happy that my tinkering had such sweet results.


This is made with mill scraps from the Pendleton woolen mill here in Oregon.


After a couple of small changes, I hope to have a few of these cuties ready for my Etsy shop; I'll update here when that happens, so stay tuned or send me a little message if you'd like to be notified.


Have you been putting bits and pieces together to make anything cool lately? Leave me a link. I'd love to see it!


Thanks for reading.


Linking up to:

The Cottage Market 

My Repurposed Life


Wednesday, April 30, 2014

arrows on the wall

Dropping in with a quick little tip you might find useful: hanging arrows on the wall with simple hardware!


These clips are usually used for fastening cables to interior and exterior walls; I've shown them to you before when I hung my lights in the living room, I think.


They also work wonderfully well for hanging arrows directly on the wall.


I measured down from the ceiling to make sure to keep these level with each other, then just used the clips to nail them directly in place.

That's all there is to it. Maybe this will come in useful at your place? Thanks for reading!

p.s. wall art is by Nikki McClure

Linking up to:
The Cottage Market

Saturday, April 26, 2014

a simple baby shower favor for nesting mamas

I'm going to keep this one short and sweet: bird's nest baby shower favors! Stock up on a couple of things after Easter, and you'll be able to make a whole grouping of nests for guests.


You'll need:

• edible Easter grass (made from potato starch; it doesn't taste very good. I found mine at Target.)
• speckled candy eggs
• parchment paper
• cellophane bags
• cardstock
• vintage-style labels (I like these)
• stapler + staples
• scissors
• pen


How to:

Take each bag of edible Easter grass and separate it carefully into five sections, one for each nest. Shape a round nest on a square of parchment that will fit inside a cellophane bag. After slipping your nest + parchment into the bag, pile six or seven candy eggs into the nest. Cut and staple cardstock tags over the folded bag tops, then cover front staples with a vintage label. I put the word "nesting" on the front, and on the back, "candy eggs * edible nest" as a little fyi.


These turned out so cute, I know I'll be using them for future showers as well! Thanks for stopping by to check out this sweet little project.

Monday, April 21, 2014

subway tile baby quilt

A friend of ours from the preschool had a baby shower for her second kiddo, a girl, a couple of weeks back, and in celebration I made this quick little subway tile-style baby quilt.


The top is made of vintage textiles I've collected at thrift stores and estate sales (poppies + stripes), stuff from my stash (including a pair of Heather Ross prints and some cute owls), and a couple of my own prints from Spoonflower (the measuring tape and cupcake prints are both mine). The kicker is that I also used a crib sheet from the recipient's registry for some of the blocks as well as the quilt backing, which ties it in nicely to the nursery bedding.


The subway tile pattern is a pretty simple one to replicate. Just cut 48 rectangular blocks (mine are 4 inches x 10 inches) and stitch into rows of four, pressing seams flat when done.

Every other row, cut a 5-inch section off of one end, and attach it to another end. Then sew the rows together to make your quilt top twelve rows high. Press all seams down.


Instead of quilt batting, I used some organic cotton + organic bamboo sweatshirt fleece in between the layers. I had it on hand and it gives the quilt a nice weight and a sturdiness that will help it last a nice long time.

I stacked and pinned the layers just like I did for my sister's wedding quilt, only on a smaller (and quicker) scale. When quilting the layers together, I stitched along both sides of each horizontal seam and called it good, except for the corners. There, I stitched some simple designs: a fish, a bird, a leaf.


I used the quilt binding technique introduced to me by the Smile and Wave blog; it's taken all the mystery out of quilt binding for me, and lets me coordinate binding to my project, which I love. I'll link to it once her site's back up. Updated 6/7/13: Here's the link.


Basically, cut 3-inch strips, sew together at an angle to avoid bulky seams, then press flat. Fold almost in half along the length (favoring one side by about 1/4 inch), press, then fold edges to the center and press again. The wider side goes on the back of your quilt, so that when you run the quilt through your sewing machine the top and bottom are certain to both get caught in the stitches.


After that, the hand finishing is a cinch.


It was a big hit with the mama-to-be, and I was pretty happy with it, too! A couple of people asked if I sell my quilts; I don't at present, but I really like to give them as gifts.

Thanks for reading! If you make your own subway tile quilt, I'd love to see!

Linking up to:
My Repurposed Life

Wednesday, April 16, 2014

modern industrial file cabinet makeover, part two

Whee! I'm back with the follow up to my recent entry about the modern industrial makeover I gave this 1980s black + fake wood steel filing cabinet.

As you might recall, a few weeks ago I started cleaning my room, realized we needed a full-sized file cabinet instead of a bunch of file boxes, and got sidetracked from the room cleaning project while I finished making it over . . .


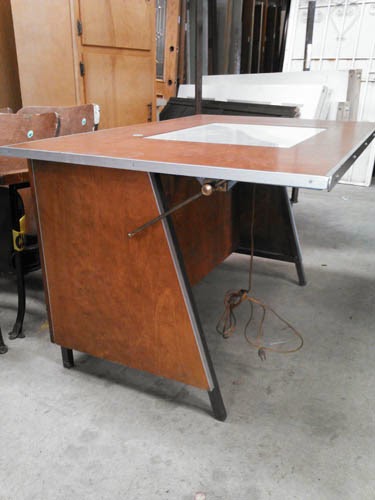
. . . into this bare steel industrial-style cabinet.  I don't mind having it in my house, even though it's full of boring papers and responsibility.


It's not just me, right? This is a little like when Eliza Dolittle turns out to be a stunner. (The rain in Spain is falling mainly on the plain, am I right?) Or like when Rachael Leigh Cook takes off the glasses and Freddie Prinze Jr. realizes she's Superman?

I really like the way this turned out.

When I last wrote about this cabinet, I'd stripped and sanded the main body and managed to get most of the paint off. I decided to keep the paint that remained after hours of palm sanding (aka: clanging and waking the neighbors) and I'm pretty happy about it. The black paint in the rivets, dents, and folds makes me happy.


Then I attached the casters, bought new from Harbor Freight on super sale. I had first searched the big bin o' casters at Bring and came up a couple short of a matching set, sadly. I like to check there first then follow up elsewhere. I don't always find what I need on the first try, but when I do, it's always worth the search.

I flipped the cabinet, exposing its rusty underside . . .


. . . and used the casters to mark where to drill the holes.


Once the holes were drilled and the filings swept away, I used three little bolts and three little nuts to attach each caster to the cabinet (the fourth hole won't fit on the frame).


And then, with all of the wheels attached, I flipped it upright and the easy part was done.


I say that because this next bit was kind of a trial.

I really wanted bare steel fronts until I started sanding the first drawer with the palm sander. It was slow, noisy work that reminded me (negatively) of sanding the cabinet (clangity clang clang!). I thought I might prime + chalkboard the drawer faces instead. And it was a bad idea.


I'd just finished removing all of that black paint from the rest of the cabinet and I didn't at all like it on the drawer fronts. The paintbrush marks didn't appeal to me, either, so I switched courses (after everything was painted, unfortunately) and decided to try sandblasting.

After a few days of waiting and gathering supplies, here's one attempt with the sandblaster + walnut shell media + 30 minutes. Look at how it's not even breaking through the original wood patterned paint. Awesome.


I switched to using sand as media and had an easier time of it, but really, our air compressor is just too wimpy for sandblasting.

I decided to try the orange paint stripper again and actually had pretty awesome luck with it. You can see here the less reflective (darker) areas where, after an hour or so of sandblasting, some of the paint came off. The lighter areas are where the paint stripper did it's thing, and then I did mine with a Scotch Brite pad, a sanding block, and some steel wool.


It took a bit of work to get the finish even, but only on this one drawer. The others hadn't been sandblasted yet when I moved on to paint stripper.

Handles were next! I shared a photo of seemingly random bits of metal hardware in the previous post; they weren't random after all, at it turns out. I used some of those pieces to make four new handles with the character I wanted.

I made the handles from some blank metal outlet plates and what I think were probably sliding screen door handles in a former life. This was my favorite part of this makeover, and the thing I think added the most to the piece. (I bought the light switch plates, too, unsure of which combination would work out. These cost between twenty-five and fifty cents at Bring, and I'll be able to find another use for them so I wasn't concerned about over-purchasing.)


I drilled holes through the old handles, using the blank outlet plates as templates. Little bolts and nuts joined them together to make a nice flat surface for the final piece.


After drilling one more hole and applying one more bolt per drawer, the handles are complete. When well-tightened, these don't shift or wiggle (possibly because the bolts underneath encourage them to stay in place).


Here it is, back in one piece, exuding awesomeness and making paperwork look a whole lot less 1980s-style boring.


This was a time-consuming project, but not outrageously expensive:

filing cabinet: $11.25 on sale at St. Vincent dePaul
handle parts: $5 or so, total, used from Bring
casters: $4 total, on super sale at Harbor Freight for $1 each
bolts + nuts: $5 or so, including bolts from Bring, nuts from the hardware store
coarse sandpapers and sanding block: $6
orange stripping gel spray: $9
Scotch Brite pads: had on hand

Ultimately the sandblasting kit and media weren't necessary or useful for this project, so I'm leaving them off the materials list. In lieu of a powerful air compressor/sandblaster combination, what you really need to finish something like this is a whole mess of elbow grease.

Thanks for sticking with me through the many, many words and pictures! I'm really pleased with how it came out, in case you couldn't tell. Now I can start obsessing over something else on Pinterest.

Linking up to:
My Repurposed Life
The Cottage Market