Dropping in with a quick little tip you might find useful: hanging arrows on the wall with simple hardware!
These clips are usually used for fastening cables to interior and exterior walls; I've shown them to you before when I hung my lights in the living room, I think.
They also work wonderfully well for hanging arrows directly on the wall.
I
measured down from the ceiling to make sure to keep these level with
each other, then just used the clips to nail them directly in place.
That's all there is to it. Maybe this will come in useful at your place? Thanks for reading!
p.s. wall art is by Nikki McClure
Linking up to:
The Cottage Market
Showing posts with label art. Show all posts
Wednesday, April 30, 2014
Monday, April 7, 2014
mini art kit
A recent car trip highlighted the need to have various distractions
for the kiddo in my bag at all times. I wanted a stash of compact little
things to fit in there that won't add too much extra bulk, but will
keep him entertained in a restaurant, in the back seat, or in a yurt
during an overly rainy overnight trip to the beach. Not that I'm
speaking from experience or anything.
An empty mint tin is a great way to organize a few art supplies, including a couple of those crayons that restaurants sometimes give out.
I also added a couple of short colored pencils, some neon posterboard cut to size, and a sheet of stickers sent to me as part of an advertisement. (Kids magazines sometimes send them out to tempt us to subscribe.)
When cutting the posterboard, I made sure to leave an inch of space at the end and a textured edge to make it easier to remove from the box.
And there is is! A mini art kit perfect for stashing in your bag, next to a Hot Wheels car and a travel-sized packet of Play Doh.
I know it's really the Boy Scout motto, but I think I'm going to adopt "Be Prepared" as my own.
Thanks for reading!
Tuesday, February 18, 2014
paperman inspired love
Inspired by the 2012 animated short Paperman and all the flying machine party prep, I made this watercolor pencil art.
It happened to be ready weeks before Valentine's Day, too! I hope yours was lovely.
Friday, April 12, 2013
freezer paper stencil toddler art pretzel t-shirt
My kiddo is less familiar with the 1960s than with pretzels, so it wasn't really too surprising when he pronounced the glittery, neon pink "peace sign" shirt a "pretzel shirt" and said he wanted to wear one. I thought something like that might make a nice project for one of the blank t-shirts we've picked up recently, so we headed home to make our own pretzel shirt.
Really, though, this would make a nice project for whatever image your kid wants. And the best part is that it's a great project for even little kids to help with, which means you're not trying to work on it by yourself while your kiddo is pulling at your sleeves.
You can take a peek at one of my previous freezer paper stencil projects (1 and 2) for the basics if you're not familiar with the freezer paper stencil process. Basically, cut a stencil from freezer paper and iron it on. For this project, we also used Crayola's fabric markers (previous freezer paper stencil projects here used acrylic paints and Tee Juice pens).
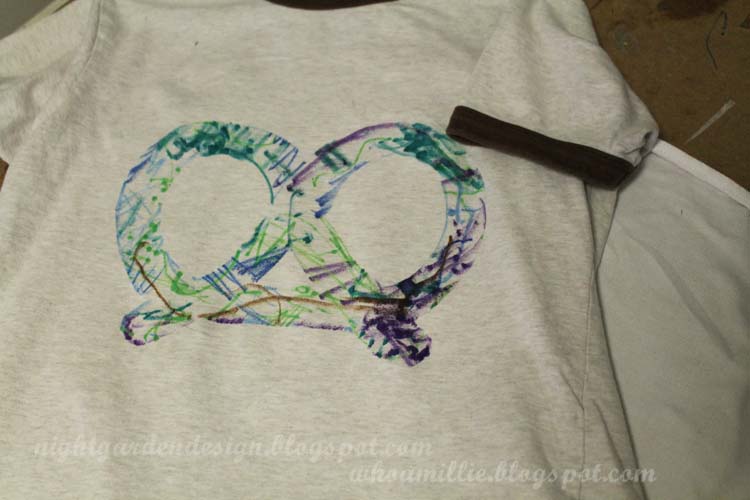
Because I planned on the kiddo doing most of the coloring, I covered as much of the t-shirt as possible with freezer paper to prevent color from ending up in unintended places. You'll also want to put a piece of cardboard inside the shirt to keep color from seeping through to the back if (like me) you have an enthusiastic marker-wielder.
I let the kiddo pick the colors and tried to encourage him to make sure a lot of color made it onto the shirt rather than the paper . . . but yeah, that's pretty much a losing battle, so I surrendered early. After removing the stencil and heat-setting the design, we were done.
And here it is, finished! We were both pretty happy with the way it came out, although I think if I were to repeat this project, I'd outline the shape completely first so that any areas with lighter coverage wouldn't blend into the background quite so much. But I think that even without that step, this was a nice collaborative project. He got to color on a shirt, and I got to help make sure it looks like a pretzel.
Thanks for reading! What projects have you been doing with your toddlers lately? We're always looking for fun projects that keep well (read: don't have to be tossed out after a week).
p.s. you can make these photos larger by clicking on them; but you already knew that, clever you.
Subscribe to:
Posts (Atom)